↧
Kubernetes Failure Stories
↧
Best Cyber Security Certifications 2019
Best Cyber Security Certifications 2019
https://www.hackread.com/best-cyber-security-certifications-2019/
https://www.hackread.com/best-cyber-security-certifications-2019/
↧
↧
How to enable SameSite for WildFly and JBoss EAP
Background
A good cookie header should look like:
Set-Cookie: a=b; HttpOnly; secure; SameSite=strict
(HttpOnly = No JavaScript; secure = SSL only; SameSite = no cross-origin cookie sharing)
https://www.owasp.org/index.php/SameSite
Java Servlet 4.0 (Java EE 8)
The sad thing about SameSite is that is not supported in Servlet 4.0.
Java(TM) EE 8 Specification APIs: https://javaee.github.io/javaee-spec/javadocs/javax/servlet/http/Cookie
Wildfly 16
Since Wildfly is built in java, the Wildfly server does not support SameSite.
9.7.3. Servlet container configuration
Session Cookie Configuration
https://docs.wildfly.org/16/Admin_Guide.html#Undertow
JSR 369: JavaTM Servlet 4.0 Specification
https://jcp.org/en/jsr/detail?id=369
JSR 366: Java Platform, Enterprise Edition 8 (Java EE 8) Specification
https://jcp.org/en/jsr/detail?id=366
Example
<servlet-container name="default">
<session-cookie http-only="true" secure="true"/>
<jsp-config/>
</servlet-container>
Solution
Best solution I have found is to build a custom Filter, which add SameSite=strict.
https://stackoverflow.com/questions/49697449/how-to-enable-samesite-for-jsessionid-cookie
↧
Implement Metrics with Java EE Interceptors and Exposing with MBean
Background
A crucial capability when deploying an application to production is to be able to monitor it and set alerts if application is running slow. This is the background for Eclipse Micropofile Metrics project, which most Java EE container does not yet support, but will probably in near future.
The other thing you need after added monitoring is to expose that data and many monitoring tools use MBean for that.
So here we are going to show how to add Timer Metrics in a Java EE way with Interceptors (previously called Aspect Oriented Programming, AOP) and to expose that data with MBean.
Reference:
- https://github.com/eclipse/microprofile-metrics
- http://www.adam-bien.com/roller/abien/entry/microprofile_java_ee_8_thinner
Java EE Interceptors
The interceptor consist of one class, which is annotated with @javax.interceptor.Interceptor and have one method annotated with @javax.interceptor.AroundInvoke.
package se.magnuskkarlsson.metrics.control;

import java.util.logging.Logger;

import javax.inject.Inject;
import javax.interceptor.AroundInvoke;
import javax.interceptor.Interceptor;
import javax.interceptor.InvocationContext;

import se.magnuskkarlsson.metrics.boundary.TimerResource;

@Interceptor
public class TimerInterceptor {

    private final Logger log = Logger.getLogger(TimerInterceptor.class.getName());
    @Inject
    protected TimerResource resource;

    // ----------------------- Logic Methods -----------------------

    @AroundInvoke
    public Object intercept(InvocationContext ctx) throws Exception {
        String className = ctx.getTarget().getClass().getName();
        String methodName = ctx.getMethod().getName();
        long start = System.currentTimeMillis();
        try {
            // call the target code
            return ctx.proceed();
        } finally {
            // target code can fail so we measure the duration with a finally block
            long duration = System.currentTimeMillis() - start;
            log.info(className + "#" + methodName + "" + duration + " ms");
            resource.getStatisticsMBean(className).add(methodName, duration);
        }
    }

    // ----------------------- Helper Methods -----------------------

    // ----------------------- Get and Set Methods -----------------------

}
Reference:
- https://javaee.github.io/javaee-spec/javadocs/javax/interceptor/AroundInvoke.html
- https://javaee.github.io/javaee-spec/javadocs/javax/interceptor/Interceptor.html
MBean
A MBean is a POJO, but with naming requirements:
- First it needs an interface.
- Second the interface name must end with MBean.
- And finally the implementing class must be named as same as the interface, but without the MBean.
package se.magnuskkarlsson.metrics.control;

import java.util.Map;

public interface TimerMBean {

    public void add(String key, long value);

    public Map<String, String> getTimers();

}
package se.magnuskkarlsson.metrics.control;

import java.util.LongSummaryStatistics;
import java.util.Map;
import java.util.concurrent.ConcurrentHashMap;
import java.util.stream.Collectors;

public class Timer implements TimerMBean {

    private final ConcurrentHashMap<String, LongSummaryStatistics> timers = new ConcurrentHashMap<>();

    // ----------------------- Logic Methods -----------------------

    @Override
    public void add(String key, long value) {
        // "The entire method invocation is performed atomically"
        LongSummaryStatistics summary = timers.computeIfAbsent(key, k -> new LongSummaryStatistics());
        summary.accept(value);
    }

    @Override
    public Map<String, String> getTimers() {
        return timers.entrySet().stream().collect(Collectors.toMap(e -> e.getKey(), e -> e.getValue().toString()));
    }

    // ----------------------- Helper Methods -----------------------

    // ----------------------- Get and Set Methods -----------------------

}
Reference:
- http://www.adam-bien.com/roller/abien/entry/singleton_the_simplest_possible_jmx
- https://access.redhat.com/documentation/en-us/red_hat_jboss_enterprise_application_platform/7.2/html/development_guide/jboss_eap_mbean_services
Java EE Singleton
Finally we need to register these MBeans to you Java EE container and also unregister those when your application is undeployed. To keep track of these MBeans I use a Java EE singleton. The singleton pattern is generally not recommended, but for specific purpose it is good.
A Java EE Singleton is an EJB, which means it is transaction aware, available via dependency injection, but also it is default thread safe by the Java EE container, this is both good and bad. Good because it shields the developer from writing thread safe code, but also bad since locking is not good for performance.
You can choose which looking mode you will have with @javax.ejb.ConcurrencyManagement, the default value for it is javax.ejb.ConcurrencyManagementType.CONTAINER, which means the container will do the locking. But you can also control locking with @javax.ejb.Lock(javax.ejb.LockType.READ) and @javax.ejb.Lock(javax.ejb.LockType.WRITE) and locking timeouts with @javax.ejb.AccessTimeout.
See for example https://www.byteslounge.com/tutorials/java-ee-ejb-concurrency-concurrencymanagement-lock-and-locktype for examples.
But here we will manage the concurrency by yourself, with the help of java.util.concurrent.ConcurrentHashMap and it's method computeIfAbsent which is thread safe. The second argument in computeIfAbsent is a construction for new values if the key is not existing.
package se.magnuskkarlsson.metrics.boundary;

import java.lang.management.ManagementFactory;
import java.util.concurrent.ConcurrentHashMap;
import java.util.logging.Level;
import java.util.logging.Logger;

import javax.annotation.PreDestroy;
import javax.ejb.ConcurrencyManagement;
import javax.ejb.ConcurrencyManagementType;
import javax.ejb.Singleton;
import javax.ejb.Startup;
import javax.management.MBeanServer;
import javax.management.ObjectName;

import se.magnuskkarlsson.metrics.control.Timer;
import se.magnuskkarlsson.metrics.control.TimerMBean;

@Singleton
@Startup
// "Bean developer is responsible for managing concurrent access to the bean instance."
@ConcurrencyManagement(ConcurrencyManagementType.BEAN)
public class TimerResource {

    private final Logger log = Logger.getLogger(TimerResource.class.getName());
    private ConcurrentHashMap<String, TimerMBean> mbeans = new ConcurrentHashMap<>();

    // ----------------------- Logic Methods -----------------------

    public TimerMBean getStatisticsMBean(final String className) {
        // "The entire method invocation is performed atomically"
        return mbeans.computeIfAbsent(className, k -> registerMBean(className));
    }

    @PreDestroy
    public void preDestroy() {
        for (String key : mbeans.keySet()) {
            try {
                MBeanServer mBeanServer = ManagementFactory.getPlatformMBeanServer();
                ObjectName objectName = new ObjectName("metrics.timer:type=" + key);
                mBeanServer.unregisterMBean(objectName);
                log.info("Successfully unregistered " + objectName);
            } catch (Exception e) {
                log.log(Level.WARNING, "Failed to unregister MBean.", e);
            }
        }
    }

    // ----------------------- Helper Methods -----------------------

    protected TimerMBean registerMBean(String className) {
        try {
            MBeanServer mBeanServer = ManagementFactory.getPlatformMBeanServer();
            ObjectName objectName = new ObjectName("metrics.timer:type=" + className);
            Timer statistics = new Timer();
            mBeanServer.registerMBean(statistics, objectName);
            log.info("Successfully registered " + objectName);
            return statistics;
        } catch (Exception e) {
            throw new IllegalStateException("Failed to register MBean.", e);
        }
    }

    // ----------------------- Get and Set Methods -----------------------

}
Reference:
Usage
Now you can simply add the @javax.interceptor.Interceptors to your methods you want to get timer metrics from.
    @GET
    @Interceptors(TimerInterceptor.class)
    public List<Person> getAll() { }
Test
To verify the final result open JConsole or VisualVM and get MBean.

↧
https://stackoverflow.com/questions/52431764/difference-between-openjdk-and-adoptopenjdk

↧
↧
Getting Started with NetBeans and Java EE 8 and JBoss EAP 7.2
Introduction
NetBeans has very good Java EE integration both for code completion support, but also deploying, running and debugging Java EE application in a Java EE container.
Currently is NetBeans moving to Apache NetBeans, but this is still work in progress and involves licensing. See e.g. https://developer.jboss.org/thread/279950.
Current Apache NetBeans releases have limitations, so I recommend sticking with the latest Oracle/Sun version 8.2, until the migration process is more done. The 8.2 version is running on Java 8.
- Apache NetBeans 10 has no Java EE support.
- Apache NetBeans 11 has Java EE support, but not WildFly or JBoss EAP. Supports Java 11.
Installation
There is also a ready to use installation script, but I prefer downloading the zip version. The zip version is also good when working on offline computers.
- Download netbeans-8.2-201609300101-javaee.zip from https://netbeans.org/downloads/zip.html.
- Unzip to e.g. /home/magnuskkarlsson/bin/netbeans-8.2-201609300101-javaee
- Run it with bin/netbeans
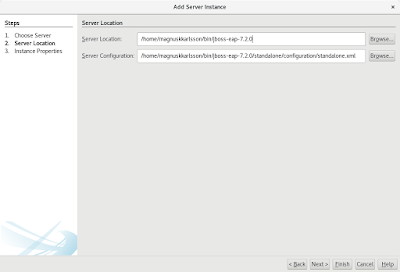
Then you need to download and extract JBoss EAP 7.2 from https://developers.redhat.com/products/eap/download/ to e.g. /home/magnuskkarlsson/bin/jboss-eap-7.2.0
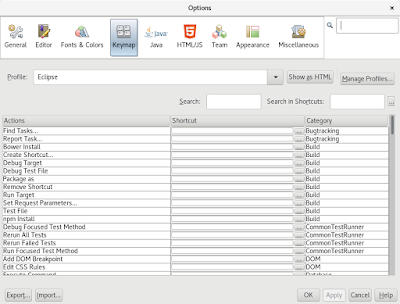
Before we set up our Java EE Web project inside NetBeans i prefer to change the keyboard shortcut to Eclipse. Open Tools -> Options.
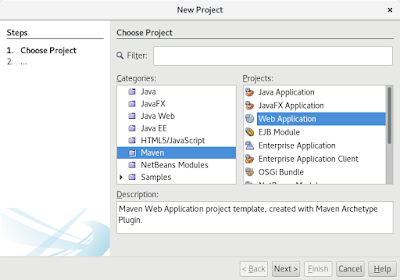
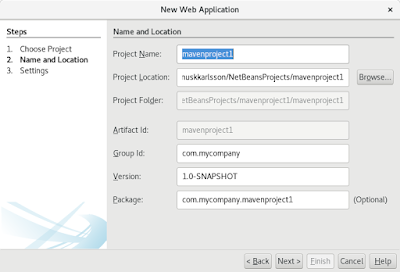
Now we are ready to create Java EE 8 project. Open File -> New Project...
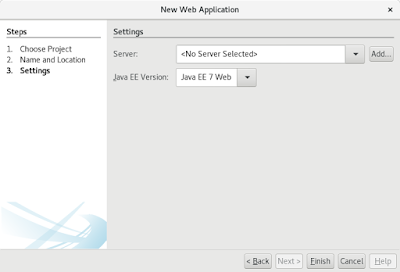
Here we need to add JBoss EAP. To add the version 7.2 as a JBoss EAP does not work, but you can add it as a WildFly application server.

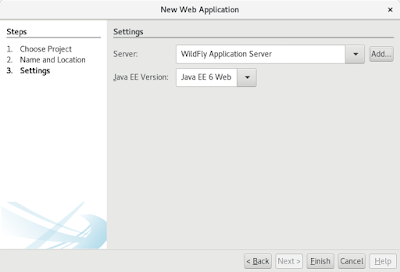
Then click finish. Now your maven Java EE Web project is created, but we need to clean it up and modify the pom.xml to use Java EE 8 instead. I also added some testing dependencies, which are handy when doing JPA integration testing. For generating random test data I use javafaker.
<?xml version="1.0" encoding="UTF-8"?>
<project xmlns="http://maven.apache.org/POM/4.0.0"
         xmlns:xsi="http://www.w3.org/2001/XMLSchema-instance"
         xsi:schemaLocation="http://maven.apache.org/POM/4.0.0 http://maven.apache.org/xsd/maven-4.0.0.xsd">

<modelVersion>4.0.0</modelVersion>
<groupId>se.magnuskkarlsson.examples</groupId>
<artifactId>example-javaee8</artifactId>
<version>1.0-SNAPSHOT</version>
<packaging>war</packaging>

<properties>
<project.build.sourceEncoding>UTF-8</project.build.sourceEncoding>
<project.build.outputEncoding>UTF-8</project.build.outputEncoding>
<maven.compiler.source>1.8</maven.compiler.source>
<maven.compiler.target>1.8</maven.compiler.target>
<failOnMissingWebXml>false</failOnMissingWebXml>
</properties>

<dependencies>
<dependency>
<groupId>javax</groupId>
<artifactId>javaee-api</artifactId>
<version>8.0</version>
<scope>provided</scope>
</dependency>

<!-- Test Support -->
<dependency>
<groupId>junit</groupId>
<artifactId>junit</artifactId>
<version>4.12</version>
<scope>test</scope>
</dependency>
<dependency>
<groupId>org.hamcrest</groupId>
<artifactId>hamcrest</artifactId>
<version>2.1</version>
<scope>test</scope>
</dependency>
<dependency>
<groupId>org.mockito</groupId>
<artifactId>mockito-all</artifactId>
<version>1.10.19</version>
<scope>test</scope>
</dependency>
<!-- generate random test data -->
<dependency>
<groupId>com.github.javafaker</groupId>
<artifactId>javafaker</artifactId>
<version>0.18</version>
<scope>test</scope>
</dependency>
<!-- in-memory db for jpa it -->
<dependency>
<groupId>com.h2database</groupId>
<artifactId>h2</artifactId>
<version>1.4.199</version>
<scope>test</scope>
</dependency>
<!-- production db -->
<dependency>
<groupId>mysql</groupId>
<artifactId>mysql-connector-java</artifactId>
<version>8.0.12</version>
<scope>test</scope>
</dependency>
<!-- hibernate 5 -->
<dependency>
<groupId>org.hibernate</groupId>
<artifactId>hibernate-core</artifactId>
<version>5.3.7.Final</version>
<scope>test</scope>
</dependency>
<dependency>
<groupId>org.hibernate</groupId>
<artifactId>hibernate-envers</artifactId>
<version>5.3.7.Final</version>
<scope>test</scope>
</dependency>
<!-- bean validation -->
<dependency>
<groupId>org.hibernate.validator</groupId>
<artifactId>hibernate-validator</artifactId>
<version>6.0.14.Final</version>
<scope>test</scope>
</dependency>
</dependencies>
</project>
Then modify web.xml to use Java EE 8 Servlet 4 and add JSF support - src/main/webapp/WEB-INF/web.xml.
<?xml version="1.0" encoding="UTF-8"?>
<web-app xmlns="http://xmlns.jcp.org/xml/ns/javaee"
         xmlns:xsi="http://www.w3.org/2001/XMLSchema-instance"
         xsi:schemaLocation="http://xmlns.jcp.org/xml/ns/javaee http://xmlns.jcp.org/xml/ns/javaee/web-app_4_0.xsd"
         version="4.0">

<servlet>
<servlet-name>Faces Servlet</servlet-name>
<servlet-class>javax.faces.webapp.FacesServlet</servlet-class>
<load-on-startup>1</load-on-startup>
</servlet>
<servlet-mapping>
<servlet-name>Faces Servlet</servlet-name>
<url-pattern>*.xhtml</url-pattern>
</servlet-mapping>

<welcome-file-list>
<welcome-file>index.xhtml</welcome-file>
</welcome-file-list>
</web-app>
Then add Java EE 8 CDI 2.0 - src/main/webapp/WEB-INF/beans.xml.
<?xml version="1.0" encoding="UTF-8"?>
<beans xmlns="http://xmlns.jcp.org/xml/ns/javaee"
          xmlns:xsi="http://www.w3.org/2001/XMLSchema-instance"
          xsi:schemaLocation="http://xmlns.jcp.org/xml/ns/javaee http://xmlns.jcp.org/xml/ns/javaee/beans_2_0.xsd"
          bean-discovery-mode="all"
          version="2.0">

</beans>
Now lets add a simple JSF index page - src/main/webapp/index.xhtml.
<?xml version='1.0' encoding='UTF-8' ?>
<!DOCTYPE html PUBLIC "-//W3C//DTD XHTML 1.0 Transitional//EN""http://www.w3.org/TR/xhtml1/DTD/xhtml1-transitional.dtd">
<html xmlns="http://www.w3.org/1999/xhtml"
      xmlns:h="http://xmlns.jcp.org/jsf/html"
      xmlns:core="http://xmlns.jcp.org/jsf/core">

<h:head>
<title>Facelet Title</title>
</h:head>
<h:body>
        Hello from Facelets
</h:body>
</html>
Now lets test it, by first right click on project and select Clean and Build and then Run. JBoss EAP 7.2 is now started from NetBeans and you default browser should now open and display index.xhtml.
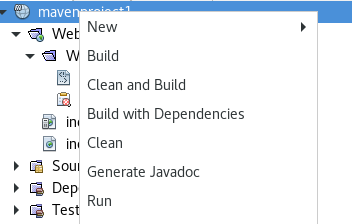
You are now ready to develop your Java EE 8 application and whenever your code is out of sync simply Clean and Build again and whenever neccessary select Run and the application will be redeployed.
↧
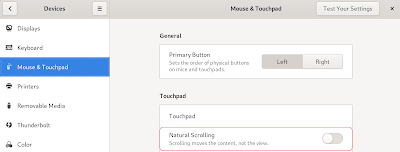
Things To Do After Installing Fedora 30
Disable Natural Scrolling
Disable the Alert Sound
Disable the alert sound, when e.g. tabbing for auto completion in the terminal window

https://help.gnome.org/users/gnome-help/stable/sound-alert.html.en
Update and if Necessary Reboot
# yum -y update
Install KVM
# yum -y install qemu-kvm libvirt virt-install bridge-utils virt-manager
# systemctl start libvirtd
# systemctl enable libvirtd
https://www.server-world.info/en/note?os=Fedora_28&p=kvm&f=1
Install GNOME Tweak Tool
# yum -y install gnome-tweak-tool
New Document or Nautilus templates
https://fedoramagazine.org/creating-using-nautilus-templates/
Install Chrome Web Browser
# yum -y install chromium
https://docs.fedoraproject.org/en-US/quick-docs/installing-chromium-or-google-chrome-browsers/
Dell XPS
For Dell XPS might not the right click on touchpad work, see
https://bugzilla.redhat.com/show_bug.cgi?id=1563429
http://who-t.blogspot.com/2018/04/gnome-328-uses-clickfinger-behaviour-by.html
↧
Installing Dogtag on Fedora 30 with SoftHSM
Official Documentation
- https://www.dogtagpki.org/wiki/PKI_Install_Guide
- https://www.dogtagpki.org/wiki/PKI_10_Installation
- https://www.dogtagpki.org/wiki/PKI_10_Installation
Prerequisite
Check OS version.
# cat /etc/redhat-release
Fedora release 30 (Thirty)
This is a lab setup, so we disable local firewall. This should never be done in production, but here we we want to focus on Dogtag and SoftHSM.
# systemctl stop firewalld; systemctl disable firewalld
The same goes for DNS, hardcode it.
# hostnamectl set-hostname dogtag-10.7.0-hsm.magnuskkarlsson.local

# ip addr show
...
    inet 192.168.122.230/24 brd 192.168.122.255 scope global dynamic noprefixroute enp1s0
...

# echo "192.168.122.230 dogtag-10.7.0-hsm.magnuskkarlsson.local">> /etc/hosts
And finally patch and reboot to make sure all new patches are installed.
# yum update -y

# reboot
389 Directory Server (1.4.1.6-1.fc30) - Installation of just Base DS
# yum install -y 389-ds-base 389-ds-base-legacy-tools
Difference between 389 DS packages
    389-ds
        Description : The 389 Directory Server, Administration Server, and Console Suite provide
            : the LDAPv3 server, the httpd daemon used to administer the server, and the
            : console GUI application used for server and user/group administration.

    389-ds-base
        Description : 389 Directory Server is an LDAPv3 compliant server.  The base package includes
                    : the LDAP server and command line utilities for server administration.
The system user the 389 DS is running as.
# grep dirsrv /etc/passwd; grep dirsrv /etc/group
dirsrv:x:389:389:user for 389-ds-base:/usr/share/dirsrv:/sbin/nologin
dirsrv:x:389:
Configure 389 DS with setup-ds.pl.
# setup-ds.pl --silent \
    General.FullMachineName='dogtag-10.7.0-hsm.magnuskkarlsson.local' \
    General.SuiteSpotUserID=dirsrv \
    General.SuiteSpotGroup=dirsrv \
    slapd.ServerPort=389 \
    slapd.ServerIdentifier=pki-tomcat \
    slapd.Suffix=dc=magnuskkarlsson,dc=se \
    slapd.RootDN="cn=Directory Manager" \
    slapd.RootDNPwd=redhat123
Your new DS instance 'pki-tomcat' was successfully created.
Exiting . . .
Log file is '/tmp/setup7Mv_YS.log'
Check installation log, that everything is OK.
# cat /tmp/setup7Mv_YS.log
[19/08/07:11:06:49] - [Setup] Info Your new DS instance 'pki-tomcat' was successfully created.
[19/08/07:11:06:49] - [Setup] Success Exiting . . .
Log file is '/tmp/setup7Mv_YS.log'
Test and verify 389 installation, by simple query.
# ldapsearch -x -h dogtag-10.7.0-hsm.magnuskkarlsson.local -p 389 -s base -b """objectclass=*"

# extended LDIF
#
# LDAPv3
# base <> with scope baseObject
# filter: objectclass=*
# requesting: ALL
#

#
dn:
objectClass: top
defaultnamingcontext: dc=magnuskkarlsson,dc=se
dataversion: 020190807090649
netscapemdsuffix: cn=ldap://dc=dogtag-hsm,dc=magnuskkarlsson,dc=local:389

# search result
search: 2
result: 0 Success

# numResponses: 2
# numEntries: 1
To start all instances.
# systemctl enable dirsrv.target; systemctl start dirsrv.target
To start specific instance.
# systemctl status dirsrv@pki-tomcat.service
Install Dogtag (10.7.0-1.fc30)
# yum install -y dogtag-pki
SoftHSM (2.5.0-3.fc30.1)
The Dogtag HSM configuration is not always complete, but here it is https://www.dogtagpki.org/wiki/SoftHSM.
# yum install -y softhsm
Configure a new slot in SoftHSM named "Dogtag" and with PIN "redhat123".
# softhsm2-util --init-token --label "Dogtag" --so-pin redhat123 --pin redhat123 --free
Since we are initializing the SoftHSM as root and Dogtag is running as pkiuser, we need to add file permission. Here we add all permission, since using SoftHSM is only for development and testing HSM, in production you use a real HSM.
# chmod 777 /var/lib/softhsm -Rv
p11-kit
p11-kit is a new feature in Fedora 29 and 30. We need to disable it, otherwise will Dogtag installation script not work.
https://pagure.io/freeipa/issue/7810
# rm -f /etc/crypto-policies/local.d/nss-p11-kit.config && update-crypto-policies

# reboot
Bugg 3093 Installation Script Ignore sslserver Token Configuration
https://pagure.io/dogtagpki/issue/3093
https://github.com/dogtagpki/pki/pull/203/commits/7ce31807907416f681af9cbd0f1007bb3f1b41e8
Implement above pull 230. Comment 'token = pki.nssdb.normalize_token(token)'
# vi /usr/lib/python3.7/site-packages/pki/server/deployment/pkiparser.py
...
    def normalize_cert_token(self, name):

        # get cert token
        token = self.mdict.get(name)

        # if not specified, get default token name
        if not token:
            token = self.mdict.get('pki_token_name')

        # normalize token name
        # token = pki.nssdb.normalize_token(token)

        # update cert token
        self.mdict[name] = token
...
Also hardcode sslserver token to internal 'token = pki.nssdb.INTERNAL_TOKEN_NAME'
# vi /usr/lib/python3.7/site-packages/pki/server/deployment/scriptlets/configuration.py
...
    def import_perm_sslserver_cert(self, deployer, instance, cert):

        nickname = cert['nickname']
        token = pki.nssdb.normalize_token(cert['token'])

        if not token:
            token = deployer.mdict['pki_token_name']

        # BUG FIX hardcoded value
        token = pki.nssdb.INTERNAL_TOKEN_NAME

        logger.info(
'Importing permanent SSL server cert into %s token: %s',
            token, nickname)

        tmpdir = tempfile.mkdtemp()
        nssdb = instance.open_nssdb(token)

        try:
            pem_cert = pki.nssdb.convert_cert(cert['data'], 'base64', 'pem')

            cert_file = os.path.join(tmpdir, 'sslserver.crt')
            with open(cert_file, 'w') as f:
                f.write(pem_cert)

            nssdb.add_cert(
                nickname=nickname,
                cert_file=cert_file)

        finally:
            nssdb.close()
            shutil.rmtree(tmpdir)
...
Install Dogtag CA (10.7.0-1.fc30)
http://www.dogtagpki.org/wiki/Installing_CA_with_HSM
# vi /root/dogtag-ca-softhsm.cfg

[DEFAULT]
pki_server_database_password=redhat123

pki_hsm_enable=True
pki_hsm_libfile=/usr/lib64/pkcs11/libsofthsm2.so
pki_hsm_modulename=softhsm
pki_token_name=Dogtag
pki_token_password=redhat123

[CA]
pki_admin_email=caadmin@example.com
pki_admin_name=caadmin
pki_admin_nickname=caadmin
pki_admin_password=redhat123
pki_admin_uid=caadmin

pki_client_database_password=redhat123
pki_client_database_purge=False
pki_client_pkcs12_password=redhat123

pki_ds_hostname=dogtag-10.7.0-hsm.magnuskkarlsson.local
pki_ds_ldap_port=389
pki_ds_bind_dn=cn=Directory Manager
pki_ds_password=redhat123
pki_ds_base_dn=o=pki-tomcat-CA

pki_security_domain_name=EXAMPLE

pki_ca_signing_token=Dogtag
pki_ca_signing_nickname=ca_signing
pki_ocsp_signing_token=Dogtag
pki_ocsp_signing_nickname=ca_ocsp_signing
pki_audit_signing_token=Dogtag
pki_audit_signing_nickname=ca_audit_signing
pki_ssl_server_token=internal
pki_sslserver_token=internal
pki_sslserver_nickname=sslserver
pki_subsystem_token=Dogtag
pki_subsystem_nickname=subsystem
# pkispawn -f /root/dogtag-ca-softhsm.cfg -s CA

Log file: /var/log/pki/pki-ca-spawn.20190808224648.log
Loading deployment configuration from /root/dogtag-ca-softhsm.cfg.
WARNING: The 'pki_ssl_server_token' in [CA] has been deprecated. Use 'pki_sslserver_token' instead.
Installing CA into /var/lib/pki/pki-tomcat.
Storing deployment configuration into /etc/sysconfig/pki/tomcat/pki-tomcat/ca/deployment.cfg.
Module "softhsm" added to database.
Notice: Trust flag u is set automatically if the private key is present.
The unit files have no installation config (WantedBy=, RequiredBy=, Also=,
Alias= settings in the [Install] section, and DefaultInstance= for template
units). This means they are not meant to be enabled using systemctl.

Possible reasons for having this kind of units are:
• A unit may be statically enabled by being symlinked from another unit's
  .wants/ or .requires/ directory.
• A unit's purpose may be to act as a helper for some other unit which has
  a requirement dependency on it.
• A unit may be started when needed via activation (socket, path, timer,
  D-Bus, udev, scripted systemctl call, ...).
• In case of template units, the unit is meant to be enabled with some
  instance name specified.

    ==========================================================================
                                INSTALLATION SUMMARY
    ==========================================================================

      Administrator's username:             caadmin
      Administrator's PKCS #12 file:
            /root/.dogtag/pki-tomcat/ca_admin_cert.p12

      Administrator's certificate nickname:
            caadmin
      Administrator's certificate database:
            /root/.dogtag/pki-tomcat/ca/alias

      This CA subsystem of the 'pki-tomcat' instance
      has FIPS mode enabled on this operating system.

      REMINDER:  Don't forget to update the appropriate FIPS
                 algorithms in server.xml in the 'pki-tomcat' instance.

      To check the status of the subsystem:
            systemctl status pki-tomcatd@pki-tomcat.service

      To restart the subsystem:
            systemctl restart pki-tomcatd@pki-tomcat.service

      The URL for the subsystem is:
            https://dogtag-10.7.0-hsm.magnuskkarlsson.local:8443/ca

      PKI instances will be enabled upon system boot

    ==========================================================================
Verification
https://github.com/dogtagpki/pki/blob/master/docs/installation/Installing_CA_with_HSM.md
Check Dogtag NSS database and that HSM token is there and sslserver is only stored locally.
# echo redhat123 > password.txt

# certutil -L -d /var/lib/pki/pki-tomcat/alias -h all -f password.txt

Certificate Nickname                                         Trust Attributes
                                                             SSL,S/MIME,JAR/XPI

sslserver                                                    u,u,u
ca_audit_signing                                             u,u,Pu
ca_signing                                                   CTu,Cu,Cu
Dogtag:ca_signing                                            CTu,Cu,Cu
Dogtag:ca_audit_signing                                      u,u,Pu
Dogtag:ca_ocsp_signing                                       u,u,u
Dogtag:subsystem                                             u,u,u
Test to connect with Dogtag by creating a User NSS DB ~/.dogtag/nssdb. First initialize it.
# pki -c redhat123 client-init
Add new Dogtag CA as trusted CA. To do that we first need to export it from Dogtag NSS DB.
# certutil -L -d /var/lib/pki/pki-tomcat/alias -n "ca_signing" -a -o ca_signing.crt
Then import it to Local User NSS DB.
# pki -c redhat123 client-cert-import --pkcs12 ~/.dogtag/pki-tomcat/ca_admin_cert.p12 --pkcs12-password-file ~/.dogtag/pki-tomcat/ca/pkcs12_password.conf
----------------------------------------
Imported certificates from PKCS #12 file
----------------------------------------
And finally import the new generated admin P12 file.
# pki -c redhat123 client-cert-import --pkcs12 ~/.dogtag/pki-tomcat/ca_admin_cert.p12 --pkcs12-password-file ~/.dogtag/pki-tomcat/ca/pkcs12_password.conf
----------------------------------------
Imported certificates from PKCS #12 file
----------------------------------------
Now we are ready to query Dogtag.
# pki -c redhat123 -n caadmin ca-user-show caadmin
--------------
User "caadmin"
--------------
  User ID: caadmin
  Full name: caadmin
  Email: caadmin@example.com
  Type: adminType
  State: 1
↧
Stream Movies on Fedora 30 from Netflix
To enable the Free repository, use:
sudo dnf install https://download1.rpmfusion.org/free/fedora/rpmfusion-free-release-$(rpm -E %fedora).noarch.rpm
Optionally, enable the Nonfree repository:
sudo dnf install https://download1.rpmfusion.org/nonfree/fedora/rpmfusion-nonfree-release-$(rpm -E %fedora).noarch.rpm
https://docs.fedoraproject.org/en-US/quick-docs/setup_rpmfusion/
sudo dnf install ffmpeg
https://www.reddit.com/r/Fedora/comments/bvktio/fedora_30_firefox_670_widevine_netflix_playback/
↧
↧
Install Docker Community Edition (CE) on Fedora 30
Uninstall old versions.
# dnf remove docker docker-client docker-client-latest docker-common docker-latest docker-latest-logrotate docker-logrotate docker-selinux docker-engine-selinux docker-engine
Install the dnf-plugins-core package which provides the commands to manage your DNF repositories from the command line.
# dnf install -y dnf-plugins-core
Install Docker Community Edition (CE) stable repository.
# dnf config-manager --add-repo https://download.docker.com/linux/fedora/docker-ce.repo
Install Docker Community Edition (CE).
# dnf install -y docker-ce docker-ce-cli containerd.io
Start Docker.
# systemctl start docker; systemctl enable docker
Test it
# docker run hello-world

Unable to find image 'hello-world:latest' locally
latest: Pulling from library/hello-world
1b930d010525: Pull complete
Digest: sha256:6540fc08ee6e6b7b63468dc3317e3303aae178cb8a45ed3123180328bcc1d20f
Status: Downloaded newer image for hello-world:latest

Hello from Docker!
This message shows that your installation appears to be working correctly.

To generate this message, Docker took the following steps:
 1. The Docker client contacted the Docker daemon.
 2. The Docker daemon pulled the "hello-world" image from the Docker Hub.
    (amd64)
 3. The Docker daemon created a new container from that image which runs the
    executable that produces the output you are currently reading.
 4. The Docker daemon streamed that output to the Docker client, which sent it
    to your terminal.

To try something more ambitious, you can run an Ubuntu container with:
 $ docker run -it ubuntu bash

Share images, automate workflows, and more with a free Docker ID:
 https://hub.docker.com/

For more examples and ideas, visit:
 https://docs.docker.com/get-started/
https://docs.docker.com/install/linux/docker-ce/fedora/
Running docker as non privilege user
docker: Got permission denied while trying to connect to the Docker daemon socket at unix:///var/run/docker.sock: Post http://%2Fvar%2Frun%2Fdocker.sock/v1.26/containers/create: dial unix /var/run/docker.sock: connect: permission denied.
See 'docker run --help'.
To run docker as non privileges user, you need to add that user to the docker group and then login out and login in again.
sudo usermod -a -G docker $USER
↧
Getting Started with Docker
First install Docker CE, see http://magnus-k-karlsson.blogspot.com/2019/08/install-docker-community-edition-ce-on.html.
To run docker containers, you can either run them in the foreground or the background.
Foreground:
$ docker run -i -t busybox:1.31.0
Unable to find image 'busybox:1.31.0' locally
1.31.0: Pulling from library/busybox
ee153a04d683: Pull complete
Digest: sha256:9f1003c480699be56815db0f8146ad2e22efea85129b5b5983d0e0fb52d9ab70
Status: Downloaded newer image for busybox:1.31.0
/ # ls
bin   dev   etc   home  proc  root  sys   tmp   usr   var
-i, run interactively
-t, connect with terminal, i.e. with same terminal as open.
To exit simply, type exit, as exiting from a normal terminal window.
Background
$ docker run -d -p 8080:80 nginx:1.17.2
Unable to find image 'nginx:1.17.2' locally
1.17.2: Pulling from library/nginx
f5d23c7fed46: Pull complete
918b255d86e5: Pull complete
8c0120a6f561: Pull complete
Digest: sha256:eb3320e2f9ca409b7c0aa71aea3cf7ce7d018f03a372564dbdb023646958770b
Status: Downloaded newer image for nginx:1.17.2
aa32c45c0cf9ca9683024f07d83378ddc73e9c6520fff052a8d104599918731a
-d, run container as daemon
-p, port mapping, part local port 8080 to container port 80
Now lets test with curl
$ curl 127.0.0.1:8080
<!DOCTYPE html>
<html>
<head>
<title>Welcome to nginx!</title>
<style>
    body {
        width: 35em;
        margin: 0 auto;
        font-family: Tahoma, Verdana, Arial, sans-serif;
    }
</style>
</head>
<body>
<h1>Welcome to nginx!</h1>
<p>If you see this page, the nginx web server is successfully installed and
working. Further configuration is required.</p>

<p>For online documentation and support please refer to
<a href="http://nginx.org/">nginx.org</a>.<br/>
Commercial support is available at
<a href="http://nginx.com/">nginx.com</a>.</p>

<p><em>Thank you for using nginx.</em></p>
</body>
</html>
To see current running containers, use docker ps
$ docker ps
CONTAINER ID        IMAGE               COMMAND                  CREATED             STATUS              PORTS                  NAMES
aa32c45c0cf9        nginx:1.17.2        "nginx -g 'daemon of…"   3 minutes ago       Up 3 minutes        0.0.0.0:8080->80/tcp   thirsty_proskuriakova
To stop a docker container use docker stop aa32c45c0cf9 or docker kill aa32c45c0cf9, to stop it not gracefully.
All docker containers get automatically an ID, to give it a more friendly name use --name mynginx, but since containers ID needs to be unique, you cannot stop the container and rerun again with same name. To avoid that you can remove the container "history" with --rm
$ docker run -d -p 8080:80 --name mynginx --rm nginx:1.17.2
1f5c642843c12bf3b8f0e91c92e603e409e8f32cfa44b957457587618e14693f
Now if you stop nginx and lets all process, you will not see nginx.
$ docker stop mynginx
mynginx

$ docker ps -a
When you need to debug, these commands are useful:
$ docker log <CONTAINERID|NAME>

$ docker inspect <CONTAINERID|NAME>
And to connect to docker container
$ docker exec -it <CONTAINERID|NAME> bash
More complex containers take input parameters - environment variable. Lets open up dockerhub and the official mysql repository - https://hub.docker.com/_/mysql. When you scroll down that page you see several environment variables. Lets test them. NOTE that MYSQL_ROOT_PASSWORD is mandatory.
$ docker run -d -p 3306:3306 --name mysql --rm -e MYSQL_ROOT_PASSWORD=redhat123 -e MYSQL_DATABASE=mydb -e MYSQL_USER=mydb_admin -e MYSQL_PASSWORD=redhat123 mysql:8.0.17
Now lets test to connect from the docker host.
$ mysql -u mydb_admin -h 127.0.0.1 -p mydb
Enter password:
Welcome to the MariaDB monitor.  Commands end with ; or \g.
Your MySQL connection id is 8
Server version: 8.0.17 MySQL Community Server - GPL

Copyright (c) 2000, 2018, Oracle, MariaDB Corporation Ab and others.

Type 'help;' or '\h' for help. Type '\c' to clear the current input statement.

MySQL [mydb]>
↧
Getting Started with Creating Docker Images
To build a docker image you create a text file named Dockerfile. Example
FROM debian:jessie
RUN apt-get update && apt-get install -y git
Now lets build a docker image, with a tag (-t) mydebian and set version to 1.0.
$ docker build -t mydebian:1.0 .
Sending build context to Docker daemon  49.14MB
Step 1/2 : FROM debian:jessie
jessie: Pulling from library/debian
e7a7e6031030: Pull complete
Digest: sha256:a8ae3c5129fb2e10a62b5c059a24308831508c44018c24ccda2e4fc6fd7cdda7
Status: Downloaded newer image for debian:jessie
 ---> 652b7a59e393
Step 2/2 : RUN apt-get update && apt-get install -y git
 ---> Running in 407556d4679a
Get:1 http://security.debian.org jessie/updates InRelease [44.9 kB]
Ign http://deb.debian.org jessie InRelease
...
Running hooks in /etc/ca-certificates/update.d....done.
Removing intermediate container 407556d4679a
 ---> 74f740ed80d4
Successfully built 74f740ed80d4
Successfully tagged mydebian:1.0
Verify the new local docker image exists.
$ docker images
REPOSITORY                  TAG                 IMAGE ID            CREATED              SIZE
mydebian                    1.0                 74f740ed80d4        About a minute ago   224MB
Lets test it and verify that git is installed.
$ docker run -it --rm --name mydebian mydebian:1.0
root@4ebe6d58927a:/# git --help
usage: git [--version] [--help] [-C] [-c name=value]
Now lets look at a more complex Dockerfile. We are going to docker containerized a simple python web - https://pythonspot.com/flask-web-app-with-python/.
# vi app/app.py

from flask import Flask
app = Flask(__name__)

@app.route("/")
def hello():
    return "Hello World!"

if __name__ == "__main__":
    app.run(host='0.0.0.0')
We copied the getting started example, but modified app.run so it binds to all network interfaces - default is only 127.0.0.1. Now lets create our dockerfile.
$ vi Dockerfile

FROM python:3.5
RUN pip install Flask
RUN useradd --create-home --shell /bin/bash appuser
USER appuser
WORKDIR /app
COPY app /app
CMD ["python", "app.py"]
FROM, from which base image
RUN, run a bash command
USER, swich container user
WORKDIR, switch default working directory for container user
COPY, copy a file into container image
CMD, start the container with following command
Now lets build our docker image, named myflask with version 1.0.
$ docker build -t myflask:1.0 .
Sending build context to Docker daemon  3.584kB
Step 1/7 : FROM python:3.5
3.5: Pulling from library/python
5ae19949497e: Pull complete
ed3d96a2798e: Pull complete
f12136850781: Pull complete
1a9ad5d5550b: Pull complete
6f18049a0455: Pull complete
8daf83b35d32: Pull complete
9e89e2e794a3: Pull complete
da6fafdc8b3e: Pull complete
a6fb723ae44c: Pull complete
Digest: sha256:4598d4365bb7a8628ba840f87406323e699c4da01ae6f926ff33787c63230779
Status: Downloaded newer image for python:3.5
 ---> 4ae385ba9dd2
Step 2/7 : RUN pip install Flask
 ---> Running in f8e6adfe71ac
Collecting Flask
  Downloading https://files.pythonhosted.org/packages/9b/93/628509b8d5dc749656a9641f4caf13540e2cdec85276964ff8f43bbb1d3b/Flask-1.1.1-py2.py3-none-any.whl (94kB)
Collecting Jinja2>=2.10.1 (from Flask)
  Downloading https://files.pythonhosted.org/packages/1d/e7/fd8b501e7a6dfe492a433deb7b9d833d39ca74916fa8bc63dd1a4947a671/Jinja2-2.10.1-py2.py3-none-any.whl (124kB)
Collecting Werkzeug>=0.15 (from Flask)
  Downloading https://files.pythonhosted.org/packages/d1/ab/d3bed6b92042622d24decc7aadc8877badf18aeca1571045840ad4956d3f/Werkzeug-0.15.5-py2.py3-none-any.whl (328kB)
Collecting itsdangerous>=0.24 (from Flask)
  Downloading https://files.pythonhosted.org/packages/76/ae/44b03b253d6fade317f32c24d100b3b35c2239807046a4c953c7b89fa49e/itsdangerous-1.1.0-py2.py3-none-any.whl
Collecting click>=5.1 (from Flask)
  Downloading https://files.pythonhosted.org/packages/fa/37/45185cb5abbc30d7257104c434fe0b07e5a195a6847506c074527aa599ec/Click-7.0-py2.py3-none-any.whl (81kB)
Collecting MarkupSafe>=0.23 (from Jinja2>=2.10.1->Flask)
  Downloading https://files.pythonhosted.org/packages/6e/57/d40124076756c19ff2269678de7ae25a14ebbb3f6314eb5ce9477f191350/MarkupSafe-1.1.1-cp35-cp35m-manylinux1_x86_64.whl
Installing collected packages: MarkupSafe, Jinja2, Werkzeug, itsdangerous, click, Flask
Successfully installed Flask-1.1.1 Jinja2-2.10.1 MarkupSafe-1.1.1 Werkzeug-0.15.5 click-7.0 itsdangerous-1.1.0
WARNING: You are using pip version 19.2.1, however version 19.2.2 is available.
You should consider upgrading via the 'pip install --upgrade pip' command.
Removing intermediate container f8e6adfe71ac
 ---> a44415ad05ad
Step 3/7 : RUN useradd --create-home --shell /bin/bash appuser
 ---> Running in 3cf59ce0bbfc
Removing intermediate container 3cf59ce0bbfc
 ---> d7751c403945
Step 4/7 : USER appuser
 ---> Running in 5cd1ce07c45b
Removing intermediate container 5cd1ce07c45b
 ---> 97d574a5c01e
Step 5/7 : WORKDIR /app
 ---> Running in 268051f212e0
Removing intermediate container 268051f212e0
 ---> 0289a837efa2
Step 6/7 : COPY app /app
 ---> 0d17013d0e9d
Step 7/7 : CMD ["python", "app.py"]
 ---> Running in 5d3194da4321
Removing intermediate container 5d3194da4321
 ---> e7cbc78bff46
Successfully built e7cbc78bff46
Successfully tagged myflask:1.0
Lets test it
$ docker run -d -p 5000:5000 --name myflask --rm myflask:1.0

$ curl 127.0.0.1:5000
Hello World!
↧
Getting Started wth Docker Links
In this blog we will create two docker container and link them together. We will first use mysql image and name that 'mysql', then containerize a simple java web application that links to the mysql container.
Lets begin with the mysql container, lets see the documentation https://hub.docker.com/_/mysql, how to start it.
$ docker run -d -p 3306:3306 --name mysql --rm -e MYSQL_ROOT_PASSWORD=redhat123 -e MYSQL_DATABASE=mydb -e MYSQL_USER=mydb_admin -e MYSQL_PASSWORD=redhat123 mysql:5.7.27
Lets also verify the database.
$ mysql -u mydb_admin -h 127.0.0.1 -p mydb
Enter password:
Welcome to the MariaDB monitor.  Commands end with ; or \g.
Your MySQL connection id is 2
Server version: 5.7.27 MySQL Community Server (GPL)

Copyright (c) 2000, 2018, Oracle, MariaDB Corporation Ab and others.

Type 'help;' or '\h' for help. Type '\c' to clear the current input statement.

MySQL [mydb]> select 1;
+---+
| 1 |
+---+
| 1 |
+---+
1 row in set (0.001 sec)

MySQL [mydb]> exit
Bye
You can also run docker ps to check that the mysql container is up and running.
Now lets create our simple java web docker image. We begin by creating a new dockerwar/pom.xml, we use the template from http://magnus-k-karlsson.blogspot.com/2016/03/minimalistic-pom-for-java-ee-7.html, but change Java EE version to 8 and add mysql-connector-java dependency. Finally we strip the version from the build war file, by overriding <finalName>.
<?xml version="1.0" encoding="UTF-8"?>
<project xmlns="http://maven.apache.org/POM/4.0.0" xmlns:xsi="http://www.w3.org/2001/XMLSchema-instance"
         xsi:schemaLocation="http://maven.apache.org/POM/4.0.0 http://maven.apache.org/xsd/maven-4.0.0.xsd">

<modelVersion>4.0.0</modelVersion>
<groupId>se.magnuskkarlsson.example</groupId>
<artifactId>dockerwar</artifactId>
<version>1.0.0-SNAPSHOT</version>
<packaging>war</packaging>

<properties>
<project.build.sourceEncoding>UTF-8</project.build.sourceEncoding>
<project.build.outputEncoding>UTF-8</project.build.outputEncoding>
<maven.compiler.source>1.8</maven.compiler.source>
<maven.compiler.target>1.8</maven.compiler.target>
<failOnMissingWebXml>false</failOnMissingWebXml>
</properties>

<dependencies>
<dependency>
<groupId>javax</groupId>
<artifactId>javaee-api</artifactId>
<version>8.0</version>
<scope>provided</scope>
</dependency>
<dependency>
<groupId>mysql</groupId>
<artifactId>mysql-connector-java</artifactId>
<version>8.0.17</version>
</dependency>
</dependencies>

<build>
<finalName>${project.artifactId}</finalName>
</build>
</project>
Then we create a simple static web page dockerwar/src/main/webapp/index.html
<!DOCTYPE html>
<html>
<head>
<title>Start Page</title>
<meta http-equiv="Content-Type" content="text/html; charset=UTF-8">
</head>
<body>
<h1>Hello World!</h1>
</body>
</html>
Now we need to write our Dockerfile. We will use wildfly for this. Lets open documentation and find latest tag - https://hub.docker.com/r/jboss/wildfly. Then we also need to understand a little more how the jboss wildfly docker image works, so lets open up the source code - https://github.com/jboss-dockerfiles/wildfly/blob/17.0.1.Final/Dockerfile.
FROM jboss/wildfly:17.0.1.Final
COPY target/dockerwar.war $JBOSS_HOME/standalone/deployments
Now lets test our docker image.
$ mvn clean install

$ docker build -t dockerwar:1.0.0 .

$ docker run -it -p 8080:8080 --name dockerwar --rm dockerwar:1.0.0

$ curl http://127.0.0.1:8080/dockerwar/
Now lets implement a super simple JDBC call from the java web app - src/main/webapp/mysql.jsp
<%@page contentType="text/html" pageEncoding="UTF-8"%>
<%@page import="java.sql.*"%>
<!DOCTYPE html>
<html>
<head>
<meta http-equiv="Content-Type" content="text/html; charset=UTF-8">
<title>MYSQL</title>
</head>
<body>
<h1>MYSQL</h1>

<p>
<%
                Class.forName("com.mysql.jdbc.Driver");
                Connection connection = null;
                try {
                    connection = DriverManager.getConnection("jdbc:mysql://mysql:3306/mydb", "mydb_admin", "redhat123");
                    Statement statement = connection.createStatement();
                    ResultSet resultSet = statement.executeQuery("SELECT 1");
                    while (resultSet.next()) {
                        out.println(resultSet.getString(1) + ", ");
                    }
                } finally {
                    if (connection != null) {
                        try {
                            connection.close();
                        } catch (Exception IGNORE) {
                        }
                    }
                }
            %>
</p>
</body>
</html>
Then rebuild java web app och docker image.
$ mvn clean install

$ docker build -t dockerwar:1.0.0 .
But when we start the java web app, we run the docker container in background and add --link mysql.
$ docker run -d -p 8080:8080 --name dockerwar --rm --link mysql dockerwar:1.0.0

$ curl http://127.0.0.1:8080/dockerwar/mysql.jsp
So how does these linking work? Lets connect to the java web app docker container.
$ docker exec -it dockerwar bash
[jboss@8954c6a27efd ~]$ cat /etc/hosts
127.0.0.1 localhost
::1 localhost ip6-localhost ip6-loopback
fe00::0 ip6-localnet
ff00::0 ip6-mcastprefix
ff02::1 ip6-allnodes
ff02::2 ip6-allrouters
172.17.0.2 mysql 625eb5301cf9
172.17.0.3 8954c6a27efd
We see that docker has added the mysql hostname to the /etc/hosts. We can also verify the IP by
$ docker inspect mysql | grep IP
"LinkLocalIPv6Address": "",
"LinkLocalIPv6PrefixLen": 0,
"SecondaryIPAddresses": null,
"SecondaryIPv6Addresses": null,
"GlobalIPv6Address": "",
"GlobalIPv6PrefixLen": 0,
"IPAddress": "172.17.0.2",
"IPPrefixLen": 16,
"IPv6Gateway": "",
"IPAMConfig": null,
"IPAddress": "172.17.0.2",
"IPPrefixLen": 16,
"IPv6Gateway": "",
"GlobalIPv6Address": "",
"GlobalIPv6PrefixLen": 0,
And the docker container ID, by docker ps
$ docker ps
CONTAINER ID        IMAGE               COMMAND                  CREATED             STATUS              PORTS                               NAMES
8954c6a27efd        dockerwar:1.0.0     "/opt/jboss/wildfly/…"   2 minutes ago       Up 2 minutes        0.0.0.0:8080->8080/tcp              dockerwar
625eb5301cf9        mysql:5.7.27        "docker-entrypoint.s…"   59 minutes ago      Up 59 minutes       0.0.0.0:3306->3306/tcp, 33060/tcp   mysql
↧
↧
Extract Windows Certificate from Windows Certificate Store
Windows certificate stored in Windows Certificate Store (certmgr.msc) are sometime called Sticky Certificate, since they are stored not safe locally and can be extracted.
https://blog.nviso.be/2019/08/28/extracting-certificates-from-the-windows-registry/
↧
Reading NSS DB from Java with SunPKCS11
Introduction
"Network Security Services (NSS) is a set of libraries designed to support cross-platform development of security-enabled client and server applications. Applications built with NSS can support SSL v3, TLS, PKCS #5, PKCS #7, PKCS #11, PKCS #12, S/MIME, X.509 v3 certificates, and other security standards." [https://developer.mozilla.org/en-US/docs/Mozilla/Projects/NSS]
And NSS DB is a binary storage for certificates and keys on disk. In this blog I will show you how to read that NSS DB from Java with SunPKCS11
Prerequisite
Install nss-tools on Fedora, RHEL, CentOS.
$ sudo yum install -y nss-tools
NSS DB Format
NSS DB has two types of databases:
- "The legacy security databases (cert8.db, key3.db, and secmod.db)"
- "And new SQLite databases (cert9.db, key4.db, and pkcs11.txt)"
Reference:https://developer.mozilla.org/en-US/docs/Mozilla/Projects/NSS/Reference/NSS_tools_:_certutil
Java according to official SunPKCS11 only supports the legacy database, but as we will see later, it does supports the new SQLite database.
"nssSecmodDirectory directory containing the NSS DB files The full pathname of the directory containing the NSS configuration and key information (secmod.db, key3.db, and cert8.db). This directive must be specified unless NSS has already been initialized by another component (see above) or NSS is used without database files as described below." [https://docs.oracle.com/javase/8/docs/technotes/guides/security/p11guide.html#NSS]
The Legacy NSS DB
Lets create a new legacy NSS DB. Note that we explicitly use the prefix dbm: when we create the DB.
$ mkdir nssdb_dbm
$ echo "redhat123"> password.txt
$ certutil -N -d dbm:nssdb_dbm -f password.txt
Now lets add a self-signed certificate and a matching private key in our legacy NSS DB.
$ certutil -S -n mkk -s 'CN=MKK, O=MKK Consultancy, C=SE' -t ',,' -k rsa -g 2048 -x -v 24 -f password.txt -d dbm:nssdb_dbm -Z SHA256
Then verify the certificate, keys and the legacy NSS DB files.
$ certutil -L -d dbm:nssdb_dbm

Certificate Nickname                                         Trust Attributes
                                                             SSL,S/MIME,JAR/XPI

mkk                                                          u,u,u

$ certutil -K -d dbm:nssdb_dbm -f password.txt
certutil: Checking token "NSS Certificate DB" in slot "NSS User Private Key and Certificate Services"
< 0> rsa      bc4e3491a87df6cd843f551a3f2bb714ecfa2bf7   NSS Certificate DB:mkk

$ ll nssdb_dbm/
total 80
-rw-------. 1 magnuskkarlsson magnuskkarlsson 65536 Sep 12 22:59 cert8.db
-rw-------. 1 magnuskkarlsson magnuskkarlsson 16384 Sep 12 22:59 key3.db
-rw-------. 1 magnuskkarlsson magnuskkarlsson 16384 Sep 12 22:58 secmod.db
Now lets write our Java program
package se.magnuskkarlsson.example.nssdb;
import java.security.Key;
import java.security.KeyStore;
import java.security.Provider;
import java.security.Security;
import java.security.cert.X509Certificate;
import java.util.Enumeration;
// https://docs.oracle.com/javase/8/docs/technotes/guides/security/p11guide.html#NSS
// https://developer.mozilla.org/en-US/docs/Mozilla/Projects/NSS/Reference/NSS_tools_:_certutil
/*
certutil supports two types of databases: the legacy
security databases (cert8.db, key3.db, and secmod.db)
and new SQLite databases (cert9.db, key4.db, and
pkcs11.txt).
*/
public class NSSTool {
public static char[] password = "redhat123".toCharArray();
public static void main(String[] args) throws Exception {
String configName = "/home/magnuskkarlsson/NetBeansProjects/example-nssdb/pkcs11.cfg";
Provider p = new sun.security.pkcs11.SunPKCS11(configName);
Security.addProvider(p);
KeyStore ks = KeyStore.getInstance("PKCS11", p); //p is the provider created above
ks.load(null, password);
System.out.println("Successfully loaded NSS DB.");
for (Enumerationaliases = ks.aliases(); aliases.hasMoreElements();) {
String alias = aliases.nextElement();
X509Certificate cert = (X509Certificate) ks.getCertificate(alias);
Key key = ks.getKey(alias, password);
System.out.println(key);
System.out.println(cert);
System.out.println("------------------------------");
}
}
}
name = NSScrypto
# nssLibraryDirectory =
nssSecmodDirectory = /home/magnuskkarlsson/NetBeansProjects/example-nssdb/nssdb_dbm
nssDbMode = readWrite
nssModule = keystore
The New SQLite NSS DB
Though the official Java documentation does state that it does not support the new format, it can read the new format, but with one hack and that is you need to create an empty secmod.db file.
But first lets create a new NSS DB with the new SQLite format, we explicitly use the prefix sql: when creating the new NSS DB.
$ mkdir nssdb_sql
$ echo "redhat123"> password.txt
$ certutil -N -d sql:nssdb_sql -f password.txt
And then the fix.
$ touch nssdb_sql/secmod.db
And finally lets create a self-signed certificate, so we have something to read.
$ certutil -S -n mkk -s 'CN=MKK, O=MKK Consultancy, C=SE' -t ',,' -k rsa -g 2048 -x -v 24 -f password.txt -d sql:nssdb_sql -Z SHA256
We now have the following files.
$ ll nssdb_sql/
total 68
-rw-------. 1 magnuskkarlsson magnuskkarlsson 28672 Sep 12 23:03 cert9.db
-rw-------. 1 magnuskkarlsson magnuskkarlsson 36864 Sep 12 23:03 key4.db
-rw-------. 1 magnuskkarlsson magnuskkarlsson   420 Sep 12 23:02 pkcs11.txt
-rw-rw-r--. 1 magnuskkarlsson magnuskkarlsson     0 Sep 12 23:04 secmod.db
The Java code stays the same, but we need to update the pkcs11.cfg with our new path
name = NSScrypto
# nssLibraryDirectory =
nssSecmodDirectory = /home/magnuskkarlsson/NetBeansProjects/example-nssdb/nssdb_sql
nssDbMode = readWrite
nssModule = keystore
↧
Reading NSS DB with SoftHSM Token with Java JSS
Introduction
In my previous blog I showed you how to read a NSS DB with SunPKCS11.. The SunPKCS11 working for both the legacy NSS database format (cert8.db, key3.db, and secmod.db) and the new SQLite format (cert9.db, key4.db, and pkcs11.txt), but SunPKCS11 cannot only read entries in the internal NSS database, not other tokens, such HSM or SmartCard.
To be able to read other tokens in a NSS DB you need to use Network Security Services for Java (JSS) for Java - https://github.com/dogtagpki/jss.
Here in this blog I will use SoftHSM to simulate a real HSM.
SoftHSM v2
References:
- https://www.dogtagpki.org/wiki/NSS_Database
- https://www.dogtagpki.org/wiki/SoftHSM
- man 5 softhsm2.conf
Install
# yum install -y softhsm
Configure a new token in SoftHSM named Dogtag and set PIN and SO (Security Officer/Admin) PIN to the first available slot.
# softhsm2-util --init-token --label "Dogtag" --so-pin redhat321 --pin redhat321 --free
Slot 0 has a free/uninitialized token.
The token has been initialized and is reassigned to slot 634761745
List the files for SoftHSM
# ls -ald /var/lib/softhsm
drwxr-x---. 3 ods ods 20 Sep 15 00:53 /var/lib/softhsm

# ls -ald /var/lib/softhsm/tokens
drwxrwx--T. 3 ods ods 50 Sep 15 00:55 /var/lib/softhsm/tokens

# ls -ald /var/lib/softhsm/tokens/372c8761-c4e8-baab-fa9c-6eb4a5d5b211
drwx------. 2 root root 62 Sep 15 00:55 /var/lib/softhsm/tokens/372c8761-c4e8-baab-fa9c-6eb4a5d5b211

# ls -al /var/lib/softhsm/tokens/372c8761-c4e8-baab-fa9c-6eb4a5d5b211/
total 8
drwx------. 2 root root  62 Sep 15 00:55 .
drwxrwx--T. 3 ods  ods   50 Sep 15 00:55 ..
-rw-------. 1 root root   8 Sep 15 00:55 generation
-rw-------. 1 root root   0 Sep 15 00:55 token.lock
-rw-------. 1 root root 320 Sep 15 00:55 token.object
Disable p11-kit
Here we are going to disable p11-kit and manually add SoftHSM module to a NSS DB.
Reference: https://pagure.io/freeipa/issue/7810
# rm -f /etc/crypto-policies/local.d/nss-p11-kit.config && update-crypto-policies

# reboot
NSS DB
Now lets create our NSS DB. We are going to use the new format SQLite and will explicitly use the prefix 'sql:' to mark that.
First install nss-tools.
# yum install -y nss-tools
Then create our new NSS DB.
# echo "redhat321"> password.softhsm
# echo "redhat123"> password.internal
# mkdir nssdb_sql_softhsm
# certutil -N -d sql:nssdb_sql_softhsm -f password.internal
Then we manually add the SoftHSM module to that NSS DB.
# rpm -ql softhsm | grep libsofthsm2.so
/usr/lib64/libsofthsm2.so
/usr/lib64/pkcs11/libsofthsm2.so

# modutil -dbdir sql:nssdb_sql_softhsm -add softhsm -libfile /usr/lib64/pkcs11/libsofthsm2.so -force

# modutil -dbdir sql:nssdb_sql_softhsm -add softhsm -libfile /usr/lib64/pkcs11/libsofthsm2.so -force

# certutil -U -d sql:nssdb_sql_softhsm

    slot: NSS Internal Cryptographic Services
   token: NSS Generic Crypto Services
     uri: pkcs11:token=NSS%20Generic%20Crypto%20Services;manufacturer=Mozilla%20Foundation;serial=0000000000000000;model=NSS%203

    slot: NSS User Private Key and Certificate Services
   token: NSS Certificate DB
     uri: pkcs11:token=NSS%20Certificate%20DB;manufacturer=Mozilla%20Foundation;serial=0000000000000000;model=NSS%203

    slot: SoftHSM slot ID 0x25d5b211
   token: Dogtag
     uri: pkcs11:token=Dogtag;manufacturer=SoftHSM%20project;serial=fa9c6eb4a5d5b211;model=SoftHSM%20v2
Now lets create a RSA keypair and self-sign a certificate containing the public key. There are a lot of arguments for that so I copied the help text below, to easier follow.
# certutil -S -x -d sql:nssdb_sql_softhsm -h Dogtag -f password.softhsm -n mkk -s 'CN=MKK, O=MKK Consultancy, C=SE' -k rsa -g 2048 -v 24 -Z SHA256 -t ',,'
...
"certutil: could not change trust on certificate: SEC_ERROR_TOKEN_NOT_LOGGED_IN: The operation failed because the PKCS#11 token is not logged in."

# certutil --help
...
-S              Make a certificate and add to database
   -n key-name       Specify the nickname of the cert
   -s subject        Specify the subject name (using RFC1485)
   -c issuer-name    The nickname of the issuer cert
   -t trustargs      Set the certificate trust attributes (see -A above)
   -k key-type-or-id Type of key pair to generate ("dsa", "ec", "rsa" (default))
   -h token-name     Name of token in which to generate key (default is internal)
   -g key-size       Key size in bits, RSA keys only (min 512, max 8192, default 2048)
   --pss             Create a certificate restricted to RSA-PSS (rsa only)
   -q pqgfile        Name of file containing PQG parameters (dsa only)
   -q curve-name     Elliptic curve name (ec only)
                     See the "-G" option for a full list of supported names.
   -x                Self sign
   --pss-sign        Sign the certificate with RSA-PSS (the issuer key must be rsa)
   -m serial-number  Cert serial number
   -w warp-months    Time Warp
   -v months-valid   Months valid (default is 3)
   -f pwfile         Specify the password file
   -d certdir        Cert database directory (default is ~/.netscape)
   -P dbprefix       Cert & Key database prefix
   -p phone          Specify the contact phone number ("123-456-7890")
   -Z hashAlg
                     Specify the hash algorithm to use. Possible keywords:
"MD2", "MD4", "MD5", "SHA1", "SHA224",
"SHA256", "SHA384", "SHA512"
   -1                Create key usage extension
   -2                Create basic constraint extension
   -3                Create authority key ID extension
   -4                Create crl distribution point extension
   -5                Create netscape cert type extension
   -6                Create extended key usage extension
   -7 emailAddrs     Create an email subject alt name extension
   -8 DNS-names      Create a DNS subject alt name extension
   --extAIA          Create an Authority Information Access extension
   --extSIA          Create a Subject Information Access extension
   --extCP           Create a Certificate Policies extension
   --extPM           Create a Policy Mappings extension
   --extPC           Create a Policy Constraints extension
   --extIA           Create an Inhibit Any Policy extension
   --extSKID         Create a subject key ID extension
   See -G for available key flag options
   --extNC           Create a name constraints extension
   --extSAN type:name[,type:name]...
                     Create a Subject Alt Name extension with one or multiple names
                     - type: directory, dn, dns, edi, ediparty, email, ip, ipaddr,
                             other, registerid, rfc822, uri, x400, x400addr
   --extGeneric OID:critical-flag:filename[,OID:critical-flag:filename]...
                     Add one or multiple extensions that certutil cannot encode yet,
                     by loading their encodings from external files.
                     - OID (example): 1.2.3.4
                     - critical-flag: critical or not-critical
                     - filename: full path to a file containing an encoded extension
...
To test it we list the certificates (-L) and the private keys (-K) for the NSS DB.
# certutil -L -d sql:nssdb_sql_softhsm -h all -f password.softhsm

Certificate Nickname                                         Trust Attributes
                                                             SSL,S/MIME,JAR/XPI

mkk                                                          u,u,u
Dogtag:mkk                                                   u,u,u

# certutil -K -d sql:nssdb_sql_softhsm -f password.internal
certutil: Checking token "NSS Certificate DB" in slot "NSS User Private Key and Certificate Services"
certutil: no keys found

# certutil -K -d sql:nssdb_sql_softhsm -h Dogtag -f password.softhsm
certutil: Checking token "Dogtag" in slot "SoftHSM slot ID 0x25d5b211"
< 0> rsa      1e1581006057a890e9a757314893352dc721a959   Dogtag:mkk

# ll nssdb_sql_softhsm/
total 68
-rw-------. 1 root root 28672 Sep 15 01:02 cert9.db
-rw-------. 1 root root 36864 Sep 15 00:59 key4.db
-rw-------. 1 root root   483 Sep 15 00:59 pkcs11.txt
Network Security Services, NSS, for Java (JSS)
So we have now set up our NSS DB with a SoftHSM token Dogtag. Now move onto the Java part with JSS. First install it jss and its dependency.
# yum install -y jss
# vi NSSJSSTool.java
import static java.nio.charset.StandardCharsets.UTF_8;
import java.security.InvalidKeyException;
import java.security.NoSuchAlgorithmException;
import java.security.Signature;
import java.security.SignatureException;
import java.util.Arrays;
import java.util.Base64;
import java.util.Enumeration;
import org.mozilla.jss.CryptoManager;
import org.mozilla.jss.crypto.CryptoStore;
import org.mozilla.jss.crypto.CryptoToken;
import org.mozilla.jss.crypto.ObjectNotFoundException;
import org.mozilla.jss.crypto.TokenException;
// NEW project page: https://github.com/dogtagpki/jss
// https://github.com/dogtagpki/jss/blob/master/org/mozilla/jss/tests/KeyStoreTest.java
public class NSSJSSTool {
public static void main(String[] args) throws Exception {
String nssDatabasePath = "/home/magnuskkarlsson/NetBeansProjects/example-nssdb/nssdb_sql_softhsm";
CryptoManager.initialize(nssDatabasePath);
CryptoManager cryptoManager = CryptoManager.getInstance();
for (Enumerationtokens = cryptoManager.getAllTokens(); tokens.hasMoreElements();) {
CryptoToken token = tokens.nextElement();
System.out.println("----------------------------------");
System.out.println(token.getName());
System.out.println("----------------------------------");
CryptoStore store = token.getCryptoStore();
for (org.mozilla.jss.crypto.X509Certificate cert : store.getCertificates()) {
System.out.println(cert.getNickname() + "\t" + cert.getSubjectDN());
org.mozilla.jss.crypto.PrivateKey privateKey = findPrivateKey(store, cert);
if (privateKey != null) {
checkKeys(privateKey, cert.getPublicKey());
}
}
}
}
// loop through all private key to find match
public static org.mozilla.jss.crypto.PrivateKey findPrivateKey(CryptoStore store,
org.mozilla.jss.crypto.X509Certificate cert) throws TokenException, ObjectNotFoundException {
for (org.mozilla.jss.crypto.PrivateKey privateKey : store.getPrivateKeys()) {
// ObjectNotFoundException If the corresponding public key is not found.
java.security.PublicKey publicKey = store.findPublicKey(privateKey);
if (Arrays.equals(cert.getPublicKey().getEncoded(), publicKey.getEncoded())) {
System.out.println(privateKey);
return privateKey;
}
}
return null;
}
public static void checkKeys(java.security.PrivateKey privateKey, java.security.PublicKey publicKey) throws
InvalidKeyException, SignatureException, NoSuchAlgorithmException {
byte[] data = "HELLO WORLD".getBytes(UTF_8);
byte[] signatureBytes = sign(privateKey, data);
boolean verify = verify(publicKey, data, signatureBytes);
}
public static byte[] sign(java.security.PrivateKey privateKey, byte[] data) throws NoSuchAlgorithmException,
InvalidKeyException, SignatureException {
Signature signature = Signature.getInstance("SHA256withRSA");
signature.initSign(privateKey);
signature.update(data);
byte[] signatureBytes = signature.sign();
String signatureEncoded = Base64.getEncoder().encodeToString(signatureBytes);
System.out.println(signatureEncoded);
return signatureBytes;
}
public static boolean verify(java.security.PublicKey publicKey, byte[] data, byte[] signatureBytes) throws
NoSuchAlgorithmException, InvalidKeyException, SignatureException {
Signature signature = Signature.getInstance("SHA256withRSA");
signature.initVerify(publicKey);
signature.update(data);
boolean verify = signature.verify(signatureBytes);
System.out.println("verify: " + verify);
return verify;
}
}
Now lets compile it and run it.
# javac -cp /usr/lib64/jss/jss4.jar:/usr/share/java/slf4j/slf4j-api.jar:/usr/share/java/slf4j/slf4j-simple.jar NSSJSSTool.java

# java -cp .:/usr/lib64/jss/jss4.jar:/usr/share/java/slf4j/slf4j-api.jar:/usr/share/java/slf4j/slf4j-simple.jar NSSJSSTool
[main] INFO org.mozilla.jss.CryptoManager - CryptoManager: loading JSS library
[main] INFO org.mozilla.jss.CryptoManager - CryptoManager: loaded JSS library from /usr/lib64/jss/libjss4.so
[main] INFO org.mozilla.jss.CryptoManager - CryptoManager: initializing NSS database at /root/nssdb_sql_softhsm
----------------------------------
NSS Generic Crypto Services
----------------------------------
----------------------------------
Internal Key Storage Token
----------------------------------
mkk CN=MKK,O=MKK Consultancy,C=SE
Enter password for Internal Key Storage Token

----------------------------------
Dogtag
----------------------------------
Enter password for Dogtag

Dogtag:mkk CN=MKK,O=MKK Consultancy,C=SE
org.mozilla.jss.pkcs11.PK11RSAPrivateKey@736e9adb
KaFqQUy+mv9nSrEkoIP/8rqG7D2bgXD9R48xw40eP/Sly4dkblSsVyBxIuZ1N89TLbFNoAQZVdP9T0sosPeZmiYOJOrxD6PMDRQoBzXsXLT1guFv6rBshV3FfcCEbdBOYKay8oEmxrg9Ks7/3PujwE0SwufPEtIqEReNFBjp4kQlegmBEGKYp+3lkMB5006kAoM66YlI8Rr68oBzTaf5fFXmIUFjPJJ1U+LiNWU/54qxEOsqePZxms9l1lU8uB01x5GV5r0sSXNPA2Nug3pQKhbVILJfNXXxqHmSKqGAGHgOPOMgiqlqtrNoqjXraZegXSg5RdvVi588FXS/tji9oA==
verify: true
↧
Reading NSS DB from Java 11 with SunPKCS11
Introduction
In my previous blog (Reading NSS DB from Java 8 with SunPKCS11) I showed how to read a NSS DB from Java 8 with SunPKCS11. In Java 11 a lot of internal packages is no longer visible and you will get compilation error if you try to access them. The same is true for sun.security.pkcs11.SunPKCS11, since it is a sun class. But SunPKCS11 is still available. What they have done is to make SunPKCS11 always available, i.e. you do not need to add, i.e. Security.addProvider(provider);
Java 8
String configName = "/home/magnuskkarlsson/NetBeansProjects/example-nssdb/pkcs11.cfg";
sun.security.pkcs11.SunPKCS11 provider = new sun.security.pkcs11.SunPKCS11(configName);
Security.addProvider(provider);
Java 11
String configName = "/home/magnuskkarlsson/NetBeansProjects/example-nssdb/pkcs11.cfg";
Provider prototype = Security.getProvider("SunPKCS11");
Provider provider = prototype.configure(configName);
One gotcha with this in Java 11, is that you need to specify the provider when you try to do cryptographic operation like signature, otherwise you will get the following error.
Exception in thread "main" java.security.InvalidKeyException: No installed provider supports this key: sun.security.pkcs11.P11Key$P11PrivateKey
So how have they solved, so that SunPKCS11 is always loaded? Through the java.security which has also moved, due to changes in directory layout in Java 11.
Java 8: $JAVA_HOME/lib/security/java.security
Java 11: $JAVA_HOME/conf/security/java.security
So in Java 11 you can see the following
security.provider.12=SunPKCS11
#security.provider.1=SunPKCS11 ${java.home}/lib/security/nss.cfg
And if you look inside $JAVA_HOME/lib/security/nss.cfg, you see a ready to use EMPTY NSS DB configuration. To read about all SunPKCS11 NSS DB configuration see https://docs.oracle.com/en/java/javase/11/security/pkcs11-reference-guide1.html#GUID-7989F8B4-7260-4908-8203-99056B2D060E
name = NSS
nssLibraryDirectory = /usr/lib64
nssDbMode = noDb
attributes = compatibility
handleStartupErrors = ignoreMultipleInitialisation
Testing Time
Now lets test the SunPKCS11 with Java 11. First lets create a new NSS DB with the new SQLite format (cert9.db, key4.db, and pkcs11.txt) and then add a keypair and a self-signed certificate in the internal token.
$ echo "redhat123"> password.internal
$ mkdir nssdb_sql

$ certutil -N -d sql:nssdb_sql -f password.internal

$ certutil -S -x -d sql:nssdb_sql -f password.internal -n mkk -s 'CN=MKK, O=MKK Consultancy, C=SE' -k rsa -g 2048 -v 24 -Z SHA256 -t ',,'
And don't forget to add an empty secmod.db.
$ touch nssdb_sql/secmod.db
Then create the SunPKCS11 configuration file pkcs11.cfg.
name = NSScrypto
nssLibraryDirectory = /usr/lib64
nssSecmodDirectory = /home/magnuskkarlsson/NetBeansProjects/example-nssdb/nssdb_sql
nssDbMode = readWrite
nssModule = keystore
package se.magnuskkarlsson.example.nssdb;
import static java.nio.charset.StandardCharsets.UTF_8;
import java.security.KeyStore;
import java.security.PrivateKey;
import java.security.Provider;
import java.security.PublicKey;
import java.security.Security;
import java.security.Signature;
import java.security.cert.X509Certificate;
import java.util.Base64;
import java.util.Enumeration;
// https://docs.oracle.com/javase/8/docs/technotes/guides/security/p11guide.html#NSS
// https://docs.oracle.com/en/java/javase/11/security/pkcs11-reference-guide1.html#GUID-85EA1017-E59C-49B9-9207-65B7B2BF171E
// https://developer.mozilla.org/en-US/docs/Mozilla/Projects/NSS/Reference/NSS_tools_:_certutil
/*
certutil supports two types of databases: the legacy
security databases (cert8.db, key3.db, and secmod.db)
and new SQLite databases (cert9.db, key4.db, and
pkcs11.txt).
*/
/*
name = NSScrypto
nssLibraryDirectory = /usr/lib64
nssSecmodDirectory = /home/magnuskkarlsson/NetBeansProjects/example-nssdb/nssdb_sql
nssDbMode = readWrite
nssModule = keystore
*/
public class NSSSunPKCS11Tool {
public static char[] password = "redhat123".toCharArray();
public static void main(String[] args) throws Exception {
String configName = "/home/magnuskkarlsson/NetBeansProjects/example-nssdb/pkcs11.cfg";
// Java 8
// sun.security.pkcs11.SunPKCS11 provider = new sun.security.pkcs11.SunPKCS11(configName);
// Security.addProvider(provider);
//
// Java 11
Provider prototype = Security.getProvider("SunPKCS11");
Provider provider = prototype.configure(configName);
KeyStore ks = KeyStore.getInstance("PKCS11", provider);
ks.load(null, password);
System.out.println("Successfully loaded NSS DB.");
System.out.println("------------------------------");
for (Enumerationaliases = ks.aliases(); aliases.hasMoreElements();) {
String alias = aliases.nextElement();
X509Certificate cert = (X509Certificate) ks.getCertificate(alias);
PublicKey publicKey = cert.getPublicKey();
PrivateKey privateKey = (PrivateKey) ks.getKey(alias, password);
System.out.println("alias: " + alias);
System.out.println("privateKey: " + privateKey);
System.out.println("cert subject dn: " + cert.getSubjectX500Principal().toString());
if (privateKey != null) {
String plainText = "HELLO WORLD";
Signature privateSignature = Signature.getInstance("SHA256withRSA", provider);
privateSignature.initSign(privateKey);
privateSignature.update(plainText.getBytes(UTF_8));
byte[] signature = privateSignature.sign();
String signatureBase64 = Base64.getEncoder().encodeToString(signature);
System.out.println(signatureBase64);
Signature publicSignature = Signature.getInstance("SHA256withRSA", provider);
publicSignature.initVerify(publicKey);
publicSignature.update(plainText.getBytes(UTF_8));
boolean verify = publicSignature.verify(signature);
System.out.println("verify: " + verify);
}
System.out.println("------------------------------");
}
}
}
Then lets run it. I have here added the debug flag -Djava.security.debug=sunpkcs11 which is of course not necessary, but useful when running labs to understand things better.
$ mvn clean install; java -cp target/example-nssdb-1.0.0-SNAPSHOT.jar -Djava.security.debug=sunpkcs11 se.magnuskkarlsson.example.nssdb.NSSSunPKCS11Tool

SunPKCS11 loading /home/magnuskkarlsson/NetBeansProjects/example-nssdb/pkcs11.cfg
NSS modules: [NSS Internal PKCS #11 Module (CRYPTO, /usr/lib64/libsoftokn3.so, slot 0), NSS Internal PKCS #11 Module (KEYSTORE, /usr/lib64/libsoftokn3.so, slot 1)]
sunpkcs11: Initializing PKCS#11 library /usr/lib64/libsoftokn3.so
Information for provider SunPKCS11-NSScrypto
Library info:
  cryptokiVersion: 2.20
  manufacturerID: Mozilla Foundation
  flags: 0
  libraryDescription: NSS Internal Crypto Services
  libraryVersion: 3.46
All slots: 1, 2
Slots with tokens: 1, 2
Slot info for slot 2:
  slotDescription: NSS User Private Key and Certificate Services
  manufacturerID: Mozilla Foundation
  flags: CKF_TOKEN_PRESENT
  hardwareVersion: 3.46
  firmwareVersion: 0.00
Token info for token in slot 2:
  label: NSS Certificate DB
  manufacturerID: Mozilla Foundation
  model: NSS 3
  serialNumber: 0000000000000000
  flags: CKF_RNG | CKF_LOGIN_REQUIRED | CKF_USER_PIN_INITIALIZED | CKF_DUAL_CRYPTO_OPERATIONS | CKF_TOKEN_INITIALIZED
  ulMaxSessionCount: CK_EFFECTIVELY_INFINITE
  ulSessionCount: 1
  ulMaxRwSessionCount: CK_EFFECTIVELY_INFINITE
  ulRwSessionCount: 0
  ulMaxPinLen: 500
  ulMinPinLen: 0
  ulTotalPublicMemory: 1
  ulFreePublicMemory: 1
  ulTotalPrivateMemory: 1
  ulFreePrivateMemory: 1
  hardwareVersion: 0.00
  firmwareVersion: 0.00
  utcTime: 0000000000000000
...
sunpkcs11: login succeeded
Successfully loaded NSS DB.
------------------------------
alias: mkk
privateKey: SunPKCS11-NSScrypto RSA private key, 2048 bitstoken object, sensitive, extractable)
cert subject dn: CN=MKK, O=MKK Consultancy, C=SE
bKqsRr+exiclVEB1Q59/M/KrElu+dCFKDK9+mertjlj1lJ7LG7Gwrws6CX/m6l3A9bf4nt+yQNYYt/2x3WFITquuBsbMKfyV6J7UHYS7J92+EUNHNXaFR2QVDo5v3Ecy4oPD9ln7LATl1jJnfSs0kiYB7HbOIWjufxfrY65sgQUyR+I3uQaj0+PDJ8WbrUbqCvzdFv3MH+Jv9kDvdp1eBkrPD+yczLdIQy7kDJRmzN34gU6tW85RZ0PpgjZomV3TO3S6hJxeZqH/ijd5yLKlpfQAM2V4dADsnlGmS9KUrZ6JOU/eIFRX6CD0X/eNsCqgUp+vn7JD/SE4NJabUdrVQw==
Demoting session, active: 3
verify: true
------------------------------
↧
↧
HTTP Client in Java 8 HttpURLConnection
The standard HTTP Client in Java 8 is HttpURLConnection, but working with it is not so intuitively, so I have written a small helper class, that does:
- All HTTP method: GET, POST, PUT, DELETE, etc.
- Sets HTTP Request Headers
- Sets HTTP POST Body
- Read response
- Read response Body
- Read response Headers
package se.magnuskkarlsson.example.httpurlconnection;

import java.io.BufferedOutputStream;
import java.io.BufferedReader;
import java.io.IOException;
import java.io.InputStream;
import java.io.InputStreamReader;
import java.io.OutputStreamWriter;
import java.net.HttpURLConnection;
import java.net.URL;
import java.nio.charset.StandardCharsets;
import java.util.List;
import java.util.Map;

public class HttpURLConnectionHelper {

    // Body type in request
    public static final String CONTENT_TYPE_APPLICATION_JSON = "Content-Type: application/json";

    // Accepted response by client
    public static final String ACCEPT_APPLICATION_JSON = "Accept: application/json";

    // ----------------------- Logic Methods -----------------------

    public Object[] get(URL url, String[] headers) throws IOException {
        return invoke(url, "GET", headers, null);
    }

    public Object[] post(URL url, String[] headers, String body) throws IOException {
        return invoke(url, "POST", headers, body);
    }

    public Object[] put(URL url, String[] headers, String body) throws IOException {
        return invoke(url, "PUT", headers, body);
    }

    public Object[] delete(URL url, String[] headers, String body) throws IOException {
        return invoke(url, "DELETE", headers, body);
    }

    // ----------------------- Helper Methods -----------------------

    protected Object[] invoke(URL url, String method, String[] headers, String body) throws IOException {
        HttpURLConnection conn = (HttpURLConnection) url.openConnection();

        conn.setRequestMethod(method);

        // Set Request Headers
        for (int i = 0; headers != null && i < headers.length; ++i) {
            String[] key_value = headers[i].split(":", -1);
            String key = key_value[0];
            String value = key_value[1];
            conn.setRequestProperty(key, value);
        }

        // Set Request Body
        if (body != null) {
            conn.setDoOutput(true);
            try (OutputStreamWriter output = new OutputStreamWriter(new BufferedOutputStream(conn.getOutputStream()),
                    StandardCharsets.UTF_8)) {

                output.write(body);
            }
        }

        // Send Request and Get Response Code
        int responseCode = conn.getResponseCode();

        // Get Response Body
        InputStream responseStream = null;
        if (responseCode >= 200 && responseCode <= 299) {
            responseStream = conn.getInputStream();
        } else {
            responseStream = conn.getErrorStream();
        }
        String responseBody = null;
        try (BufferedReader in = new BufferedReader(new InputStreamReader(responseStream, StandardCharsets.UTF_8))) {
            StringBuilder builder = new StringBuilder();
            for (String line = null; (line = in.readLine()) != null;) {
                builder.append(line);
            }
            responseBody = builder.toString();
        }

        // Get Response Headers
        Map<String, List<String>> responseHeaders = conn.getHeaderFields();

        return new Object[] { responseCode, responseBody, responseHeaders };
    }

    // ----------------------- Get and Set Methods -----------------------

}
Now lets test it, with a simple REST service.
package se.magnuskkarlsson.example.httpurlconnection;

import java.util.logging.Logger;

import javax.json.Json;
import javax.json.JsonObject;
import javax.ws.rs.Consumes;
import javax.ws.rs.GET;
import javax.ws.rs.POST;
import javax.ws.rs.Path;
import javax.ws.rs.PathParam;
import javax.ws.rs.Produces;
import javax.ws.rs.core.Context;
import javax.ws.rs.core.MediaType;
import javax.ws.rs.core.Response;
import javax.ws.rs.core.UriBuilder;
import javax.ws.rs.core.UriInfo;

@Path("/persons")
@Consumes(MediaType.APPLICATION_JSON)
@Produces(MediaType.APPLICATION_JSON)
public class PersonResource {

    private final Logger log = Logger.getLogger(PersonResource.class.getName());

    // ----------------------- Logic Methods -----------------------

    // Common Response Codes For All Requests
    // 200 OK Request was successful
    // 401 Unauthorized User not authenticated
    // 403 Forbidden User not authorized for endpoint request, often due to missing security privileges

    // Common Error Response Codes For GET
    // 404 Not Found Resource not found
    // 400 Bad Request Filter parameters provided were not valid Recommended Response Codes

    @GET
    @Path("/{personId}")
    public Response getById(@PathParam("personId") String personId) {
        if ("404".equals(personId)) {

            JsonObject json = createProblemDetails(null, "Not Found", 404,
"Person with ID " + personId + " does not exists.", null);
            return Response.status(Response.Status.NOT_FOUND).entity(json).build();
        }
        JsonObject json = Json.createObjectBuilder().add("personId", personId).add("name", "Magnus").build();
        return Response.ok(json).build();
    }

    // Common Response Codes For POST
    // 200 OK A custom action or processing request was successful
    // 201 Created Created resource successfully
    // 202 Accepted Long-running request has been accepted
    // 400 Bad Request Fields were not valid or required fields were missing

    @POST
    public Response create(String name, @Context UriInfo uriInfo) {
        log.info("name=" + name);
        UriBuilder builder = uriInfo.getAbsolutePathBuilder();
        builder.path("32");
        // CREATED 201
        return Response.created(builder.build()).build();
    }

    // Common Error Response Codes For PUT or PATCH
    // 200 OK Updated resource successfully
    // 400 Bad Request Fields were not valid or required fields were missing
    // 404 Not Found Resource not found

    // Common Error Response Codes For DELETE
    // 204 No Content Resource deleted
    // 404 Not Found Resource not found

    // ----------------------- Helper Methods -----------------------

    // Problem Details for HTTP APIs https://tools.ietf.org/html/rfc7807
    protected JsonObject createProblemDetails(String type, String title, int status, String detail, String instance) {
        type = (type != null) ? type : "about:blank";
        instance = (instance != null) ? instance : "";
        return Json.createObjectBuilder().add("type", type).add("title", title).add("status", status)
                .add("detail", detail).add("instance", instance).build();
    }

    // ----------------------- Get and Set Methods -----------------------

}
And now lets write a System Test for your REST service.
package se.magnuskkarlsson.example.httpurlconnection;

import static org.hamcrest.CoreMatchers.is;

import java.net.URL;
import java.util.List;
import java.util.Map;

import org.hamcrest.CoreMatchers;
import org.junit.Assert;
import org.junit.Test;

public class PersonResourceST {

    private String[] headers = new String[] { HttpURLConnectionHelper.CONTENT_TYPE_APPLICATION_JSON,
            HttpURLConnectionHelper.ACCEPT_APPLICATION_JSON };

    @Test
    public void test() throws Exception {
        URL url = new URL("http://localhost:8080/example-java8-httpurlconnection/rest/persons/12");

        Object[] values = new HttpURLConnectionHelper().get(url, headers);
        System.out.println("ResponseCode: " + values[0] + ", Response: " + values[1]);

        Assert.assertThat(values[0], is(200));
        Assert.assertThat(values[1], is("{\"personId\":\"12\",\"name\":\"Magnus\"}"));
    }

    @Test
    public void testNonExisting() throws Exception {
        URL url = new URL("http://localhost:8080/example-java8-httpurlconnection/rest/persons/404");

        Object[] values = new HttpURLConnectionHelper().get(url, headers);
        System.out.println("ResponseCode: " + values[0] + ", Response: " + values[1]);

        Assert.assertThat(values[0], is(404));
        Assert.assertThat((String) values[1], CoreMatchers.containsString("\"title\":\"Not Found\""));
    }

    @Test
    public void testPost() throws Exception {
        URL url = new URL("http://localhost:8080/example-java8-httpurlconnection/rest/persons");

        Object[] values = new HttpURLConnectionHelper().post(url, headers, "{\"name\":\"FOO\"}");
        System.out.println("ResponseCode: " + values[0] + ", Response: " + values[1]);

        Assert.assertThat(values[0], is(201));
        Assert.assertThat(values[1], is(""));
        Map<String, List<String>> responseHeaders = (Map<String, List<String>>) values[2];
        Assert.assertThat(responseHeaders.get("Location").get(0), CoreMatchers.notNullValue());
    }
}
↧
Minimalistic POM for Java 11 and Java EE 8
One of the greatest news with Java EE 7 and 8, is that there is ONE dependency for the entire Java EE.
And here is a minimalistic POM for your Java EE 8 projects with Java 11. I also added junit, hamcrest, mockito and in-memory DB H2 and mysql jdbc driver which are not necessary, but I use them a lot, so I added them for convenience.
<?xml version="1.0" encoding="UTF-8"?>
<project xmlns="http://maven.apache.org/POM/4.0.0"
    xmlns:xsi="http://www.w3.org/2001/XMLSchema-instance"
    xsi:schemaLocation="http://maven.apache.org/POM/4.0.0 http://maven.apache.org/xsd/maven-4.0.0.xsd">

<modelVersion>4.0.0</modelVersion>
<groupId>se.magnuskkarlsson.examples</groupId>
<artifactId>dockerwar</artifactId>
<version>1.0.0-SNAPSHOT</version>
<packaging>war</packaging>

<properties>
<project.build.sourceEncoding>UTF-8</project.build.sourceEncoding>
<project.build.outputEncoding>UTF-8</project.build.outputEncoding>
<failOnMissingWebXml>false</failOnMissingWebXml>
</properties>

<dependencies>
<dependency>
<groupId>javax</groupId>
<artifactId>javaee-api</artifactId>
<version>8.0</version>
<scope>provided</scope>
</dependency>

<!-- Test Support -->
<dependency>
<groupId>junit</groupId>
<artifactId>junit</artifactId>
<version>4.12</version>
<scope>test</scope>
</dependency>
<dependency>
<groupId>org.hamcrest</groupId>
<artifactId>hamcrest-core</artifactId>
<version>2.1</version>
</dependency>
<dependency>
<groupId>org.mockito</groupId>
<artifactId>mockito-all</artifactId>
<version>1.10.19</version>
<scope>test</scope>
</dependency>
<dependency>
<groupId>com.h2database</groupId>
<artifactId>h2</artifactId>
<version>1.4.199</version>
<scope>test</scope>
</dependency>
<dependency>
<groupId>mysql</groupId>
<artifactId>mysql-connector-java</artifactId>
<version>8.0.17</version>
<scope>test</scope>
</dependency>
</dependencies>

<build>
<plugins>
<plugin>
<groupId>org.apache.maven.plugins</groupId>
<artifactId>maven-compiler-plugin</artifactId>
<version>3.8.1</version>
<configuration>
<release>11</release>
<showDeprecation>true</showDeprecation>
<showWarnings>true</showWarnings>
</configuration>
</plugin>
</plugins>
</build>
</project>
If you need in memory database checkout "H2 Database Engine Cheat Sheet" [http://www.h2database.com/html/cheatSheet.html]
↧
Getting Started with RH SSO 7.3 (Keycloak)
Introduction
In this blog we are going to install and configure RH SSO 7.3 (upstream Keycloak) from scratch and then develop a simple Java Web application, protected with RH SSO (Keycloak).
We are going to run the RH SSO 7.3 and JBoss EAP 7.2 on the same machine and locally, but before that we need to install Java 11 (OpenJDK 11). Since this is a developing machine we are going to install every OpenJDK 11 packages.
$ sudo dnf install -y java-11-openjdk java-11-openjdk-src java-11-openjdk-demo java-11-openjdk-devel java-11-openjdk-jmods java-11-openjdk-javadoc java-11-openjdk-headless java-11-openjdk-javadoc-zip
If you have multiple of Java versions installed, please set Java 11 as default
$ sudo update-alternatives --config java

$ java -version
openjdk version "11.0.4" 2019-07-16
OpenJDK Runtime Environment 18.9 (build 11.0.4+11)
OpenJDK 64-Bit Server VM 18.9 (build 11.0.4+11, mixed mode, sharing)
RH SSO 7.3 (Keycloak)
Now install RH SSO from ZIP (in production you would install it via RPM).
$ unzip rh-sso-7.3.0.GA.zip
$ mv rh-sso-7.3 rh-sso-7.3.0
$ cd rh-sso-7.3.0/bin/

$ ./standalone.sh
Now configure Admin account, by open http://localhost:8080/auth/ and then open http://localhost:8080/auth/admin/ and login as Admin.
- In the left menu create a new Realm 'demo'.
- In the demo realm create a new User with username 'joe'
- After created User, click on User Credential tab.
- And reset User 'joe' password and don't forget to set Temporary to false.
- Then create a new Role, by clicking on left menu Role and then Add role.
- Lets name the Role to 'OIDCDEMO_USER'.
- Go back to User by clicking on User in lefter meny and find user 'joe'.
- After clicking on User 'joe', then click on tab Role Mappings.
- Select our newly created Role 'OIDCDEMO_USER' under Available Roles and click Add selected.
Web Application Server - JBoss EAP 7.2
Install via zip (in production you would install via RPM). After extracting the zip files, we install OpenID Connector to EAP via adapter-elytron-install-offline.cli and then starts EAP with a port offset of 100. To test it open http://localhost:8180/
$ unzip jboss-eap-7.2.0.zip
$ mv jboss-eap-7.2 jboss-eap-7.2.0-oidc
$ unzip rh-sso-7.3.0.GA-eap7-adapter.zip -d jboss-eap-7.2.0-oidc
$ cp jboss-eap-7.2.0-oidc/standalone/configuration/standalone.xml jboss-eap-7.2.0-oidc/standalone/configuration/standalone.xml.ORIG

$ cd jboss-eap-7.2.0-oidc/bin
$ ./jboss-cli.sh --file=adapter-elytron-install-offline.cli

$ ./standalone.sh -Djboss.socket.binding.port-offset=100
The Java EE 8 Web Application
Now lets create a simple Java EE 8 Web Application, with a single index.jsp and a logout.jsp.
$ mkdir rh-sso-7.3-demo
$ cd rh-sso-7.3-demo
$ mkdir -p src/main/java/se/magnuskkarlsson/example/oidc
$ mkdir -p src/main/resources/META-INF
$ mkdir -p src/main/webapp/WEB-INF
$ touch src/main/webapp/WEB-INF/web.xml
$ mkdir -p src/test/java/se/magnuskkarlsson/example/oidc
$ mkdir -p src/test/resources
$ vi pom.xml
<?xml version="1.0" encoding="UTF-8"?>
<project xmlns="http://maven.apache.org/POM/4.0.0" xmlns:xsi="http://www.w3.org/2001/XMLSchema-instance"
    xsi:schemaLocation="http://maven.apache.org/POM/4.0.0 http://maven.apache.org/xsd/maven-4.0.0.xsd">

<modelVersion>4.0.0</modelVersion>
<groupId>se.magnuskkarlsson.examples</groupId>
<artifactId>rh-sso-7.3-demo</artifactId>
<version>1.0.0-SNAPSHOT</version>
<packaging>war</packaging>

<properties>
<project.build.sourceEncoding>UTF-8</project.build.sourceEncoding>
<project.build.outputEncoding>UTF-8</project.build.outputEncoding>
<failOnMissingWebXml>false</failOnMissingWebXml>
</properties>

<dependencies>
<dependency>
<groupId>javax</groupId>
<artifactId>javaee-api</artifactId>
<version>8.0</version>
<scope>provided</scope>
</dependency>

<!-- Test Support -->
<dependency>
<groupId>junit</groupId>
<artifactId>junit</artifactId>
<version>4.12</version>
<scope>test</scope>
</dependency>
<dependency>
<groupId>org.hamcrest</groupId>
<artifactId>hamcrest-core</artifactId>
<version>2.1</version>
<scope>test</scope>
</dependency>
<dependency>
<groupId>org.mockito</groupId>
<artifactId>mockito-all</artifactId>
<version>1.10.19</version>
<scope>test</scope>
</dependency>
<dependency>
<groupId>com.h2database</groupId>
<artifactId>h2</artifactId>
<version>1.4.199</version>
<scope>test</scope>
</dependency>
<dependency>
<groupId>mysql</groupId>
<artifactId>mysql-connector-java</artifactId>
<version>8.0.17</version>
<scope>test</scope>
</dependency>
</dependencies>

<build>
<finalName>${project.artifactId}</finalName>
<plugins>
<plugin>
<groupId>org.apache.maven.plugins</groupId>
<artifactId>maven-compiler-plugin</artifactId>
<version>3.8.1</version>
<configuration>
<release>11</release>
<showDeprecation>true</showDeprecation>
<showWarnings>true</showWarnings>
</configuration>
</plugin>
</plugins>
</build>
</project>
Now the important part of web.xml, where we configure our security.
<?xml version="1.0" encoding="UTF-8"?>
<web-app xmlns="http://xmlns.jcp.org/xml/ns/javaee" xmlns:xsi="http://www.w3.org/2001/XMLSchema-instance"
    xsi:schemaLocation="http://xmlns.jcp.org/xml/ns/javaee http://xmlns.jcp.org/xml/ns/javaee/web-app_4_0.xsd"
    version="4.0">

<security-constraint>
<web-resource-collection>
<web-resource-name>Unprotected pages</web-resource-name>
<url-pattern>/logout.jsp</url-pattern>
</web-resource-collection>
<!-- <user-data-constraint> <transport-guarantee>CONFIDENTIAL</transport-guarantee> </user-data-constraint> -->
</security-constraint>

<security-constraint>
<web-resource-collection>
<web-resource-name>Protected pages</web-resource-name>
<url-pattern>/*</url-pattern>
</web-resource-collection>
<auth-constraint>
<role-name>OIDCDEMO_USER</role-name>
</auth-constraint>
<!-- <user-data-constraint> <transport-guarantee>CONFIDENTIAL</transport-guarantee> </user-data-constraint> -->
</security-constraint>

<login-config>
<auth-method>KEYCLOAK</auth-method>
<!-- <realm-name>demo</realm-name> -->
</login-config>

<security-role>
<role-name>OIDCDEMO_USER</role-name>
</security-role>

<session-config>
<session-timeout>15</session-timeout>
<cookie-config>
<http-only>true</http-only>
<!-- <secure>true</secure> -->
</cookie-config>
<tracking-mode>COOKIE</tracking-mode>
</session-config>
</web-app>
And our index.jsp and logout.jsp
<%@ page import="java.util.*"%>
<%@ page language="java" contentType="text/html; charset=UTF-8" pageEncoding="UTF-8"%>
<!DOCTYPE html>
<html>
<head>
<meta charset="UTF-8">
<title>Secure Web App</title>
<style>
table, th, td {
    border: 1px solid black;
    border-collapse: collapse;
}

th, td {
    padding: 10px;
}
</style>
</head>
<body>
<table border="1">
<!-- Security -->
<tr>
<td>getAuthType:</td>
<td><%=request.getAuthType()%></td>
</tr>
<tr>
<td>isSecure:</td>
<td><%=request.isSecure()%></td>
</tr>
<tr>
<td>getRemoteUser:</td>
<td><%=request.getRemoteUser()%></td>
</tr>
<tr>
<td>getUserPrincipal:</td>
<td><%=request.getUserPrincipal()%></td>
</tr>
<tr>
<td>getSession(false):</td>
<td><%=request.getSession(false)%></td>
</tr>
<tr>
<td>isUserInRole(<%=request.getParameter("UserInRole")%>):
</td>
<td>
<div>
<form action="index.jsp" method="get">
<input type="text" id="UserInRole" name="UserInRole" /> <input type="submit" name="Submit" />
</form>
</div>
<div>
<%=request.isUserInRole(request.getParameter("UserInRole"))%>
</div>
</td>
</tr>
<!-- Cookies and Headers -->
<tr>
<td>Cookies:</td>
<td>
<%
                    for (int i = 0; request.getCookies() != null && i < request.getCookies().length; ++i) {
                        Cookie cookie = request.getCookies()[i];
                        out.println(cookie.getPath() + "" + cookie.getDomain() + "" + cookie.getName() + "="
                                + cookie.getValue() + "" + cookie.isHttpOnly() + "" + cookie.getSecure() + "<br/>");
                    }
                %>
</td>
</tr>
<tr>
<td>Header:</td>
<td>
<%
                    for (Enumeration<String> headers = request.getHeaderNames(); headers.hasMoreElements();) {
                        String header = headers.nextElement();
                        out.println(header + ": " + request.getHeader(header) + "<br/>");
                    }
                %>
</td>
</tr>
<!-- Locale Address -->
<tr>
<td>getLocalAddr:</td>
<td><%=request.getLocalAddr()%></td>
</tr>
<tr>
<td>getLocalName:</td>
<td><%=request.getLocalName()%></td>
</tr>
<tr>
<td>getLocalPort:</td>
<td><%=request.getLocalPort()%></td>
</tr>
<!-- Remote Address -->
<tr>
<td>getRemoteAddr:</td>
<td><%=request.getRemoteAddr()%></td>
</tr>
<tr>
<td>getLocalName:</td>
<td><%=request.getRemoteHost()%></td>
</tr>
<tr>
<td>getRemotePort:</td>
<td><%=request.getRemotePort()%></td>
</tr>
<!-- Different Paths -->
<tr>
<td>getContextPath:</td>
<td><%=request.getContextPath()%></td>
</tr>
<tr>
<td>getPathInfo:</td>
<td><%=request.getPathInfo()%></td>
</tr>
<tr>
<td>getQueryString:</td>
<td><%=request.getQueryString()%></td>
</tr>
<tr>
<td>getRequestURI:</td>
<td><%=request.getRequestURI()%></td>
</tr>
<tr>
<td>getRequestURL:</td>
<td><%=request.getRequestURL()%></td>
</tr>
<tr>
<td>getServletPath:</td>
<td><%=request.getServletPath()%></td>
</tr>
</table>
</body>
</html>
<%@ page language="java" contentType="text/html; charset=UTF-8" pageEncoding="UTF-8"%>
<!DOCTYPE html>
<html>
<head>
<meta charset="UTF-8">
<title>Logout</title>
</head>
<body>
<%
        if (request.getSession(false) != null) {
            request.getSession(false).invalidate();
        }
        request.logout();
        /*
"You can log out of a web application in multiple ways. For Java EE servlet containers, you
        can call HttpServletRequest.logout(). For other browser applications, you can redirect
        the browser to
        http://auth-server/auth/realms/{realm-name}/protocol/openid-connect/logout?redirect_uri=encodedRedirectUri,
        which logs you out if you have an SSO session with your browser."
        [https://access.redhat.com/documentation/en-us/red_hat_single_sign-on/7.3/html/securing_applications_and_services_guide/openid_connect_3#logout]
        */
    %>
<h3>You are logged out</h3>
</body>
</html>
Configure OpenID Connect for Web Application
Now we need to configure OpenID Connect for our Web Application in RH SSO
And finally add OpenID Connect configuration to our web application src/main/webapp/WEB-INF/keycloak.json.
{
"realm": "demo",
"auth-server-url": "http://localhost:8080/auth",
"ssl-required": "external",
"resource": "rh-sso-7.3-demo",
"public-client": true,
"enable-cors": true
}
References
↧